![]() Common Entry
Screen Features
Common Entry
Screen Features ![]() Using the iSupport
Incident Screen
Using the iSupport
Incident Screen
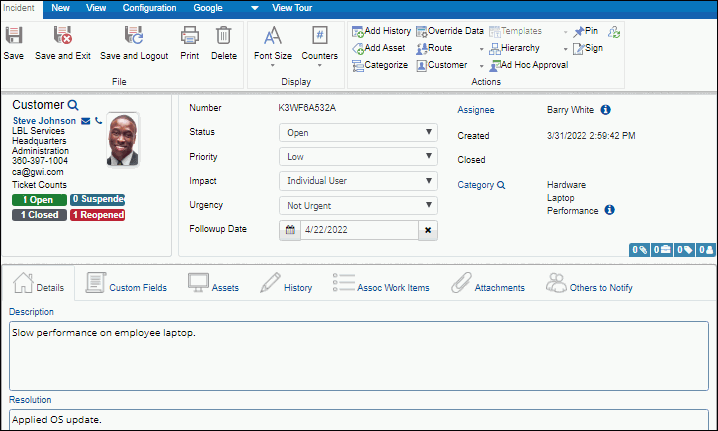
Use the Incident screen to enter essential incident information, perform miscellaneous tasks such as searching for knowledge entries and attaching files, notification tasks such as sending email, and post-entry tasks such as routing.
To create an incident, select Create | Incident from the Desktop ![]() Create menu. Incidents can also
be created via email
processing, the mySupport portal, the Mobile
Client, or by support representatives accepting mySupport portal customer
chat requests or using the Create Incident link in the Twitter Monitor
on the Desktop.
Create menu. Incidents can also
be created via email
processing, the mySupport portal, the Mobile
Client, or by support representatives accepting mySupport portal customer
chat requests or using the Create Incident link in the Twitter Monitor
on the Desktop.
See Using Approval Cycles if an approval alert bar appears at the top of the screen.
Note: The fields and layout in the Incident screen are set up in the Configuration module. Fields or functionality may not display if not configured or disallowed due to permissions set during configuration. The following sections contain information on all incident functionality.
Use the View Tour option at the top of the Incident screen to display a short series of tips on the Incident screen.
If AI integration is enabled, after an incident
is saved you can use the  AI Summary option on the
Incident toolbar to generate a one-sentence overview and summary that
can cover the customer, customer’s company, and related incidents. This
information is a result of parameters sent to the AI engine; these parameters
set up in the AI
Integration configuration screen.
AI Summary option on the
Incident toolbar to generate a one-sentence overview and summary that
can cover the customer, customer’s company, and related incidents. This
information is a result of parameters sent to the AI engine; these parameters
set up in the AI
Integration configuration screen.
The only information required in order for an incident to be saved is the customer, categorization, description, and any fields configured as required (time worked, short description, custom number, etc.).
If the Select Customer dialog
is not enabled, select Incident | Actions | Customer |  Select Customer or select the
  Select Customer
icon to select or enter
a customer. You can add
customers if needed. Defaults appear in the Assignee,
Impact, Urgency,
Priority, Status, Followup
Date fields as configured; change those values if applicable. Priority
levels (Low, Medium, High, and Emergency) indicate the severity of the
issue; priority levels can be associated with time frames in rules, so
you’ll need to consult with your administrator regarding time frames in
order to understand how quickly incidents must be resolved.
Select Customer
icon to select or enter
a customer. You can add
customers if needed. Defaults appear in the Assignee,
Impact, Urgency,
Priority, Status, Followup
Date fields as configured; change those values if applicable. Priority
levels (Low, Medium, High, and Emergency) indicate the severity of the
issue; priority levels can be associated with time frames in rules, so
you’ll need to consult with your administrator regarding time frames in
order to understand how quickly incidents must be resolved.
A unique number is assigned to each incident record. A custom incident number field may also be configured; an entry may be required.
Select ![]() Categorize or Category link
to select a categorization that
describes the incident. If there are other incidents, knowledge entries,
headlines, or problems or changes (Service Desk Edition) that have the
same categorization, the View Open Work Items for Categorization link
appears for you to view these items. You can associate knowledge entries,
headlines, problems, or changes with the current record if applicable.
Note: You can recategorize an incident at any time while the incident
is open.
Categorize or Category link
to select a categorization that
describes the incident. If there are other incidents, knowledge entries,
headlines, or problems or changes (Service Desk Edition) that have the
same categorization, the View Open Work Items for Categorization link
appears for you to view these items. You can associate knowledge entries,
headlines, problems, or changes with the current record if applicable.
Note: You can recategorize an incident at any time while the incident
is open.
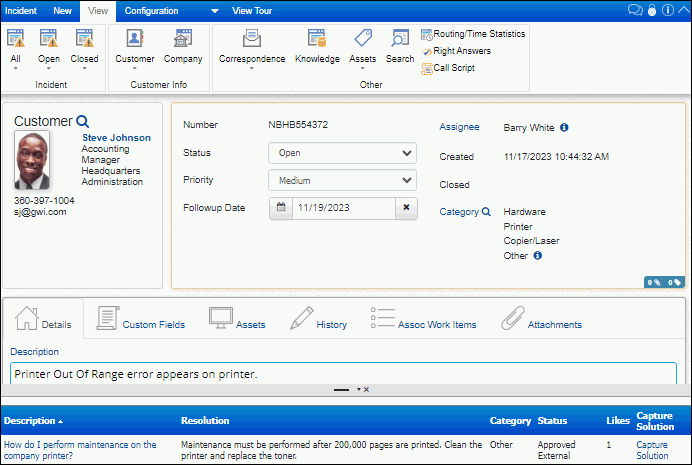
iSupport's Capture Solution feature enables you to display and copy/paste
information from a knowledge entry
matching the selected category set into related fields in an incident.
If enabled for the category in the Category configuration screen, these
entries will appear
in the view frame at the bottom of the screen automatically or after you
select View | ![]() Knowledge in the Incident screen. If
you find a knowledge entry that solves the issue, use the Capture
Solution link to copy and paste the issue description, resolution,
and/or mySupport URL (depending on what is enabled in the Knowledge Management
configuration screen) into the incident. If you open a knowledge
entry from the view frame you can select Knowledge |
Knowledge in the Incident screen. If
you find a knowledge entry that solves the issue, use the Capture
Solution link to copy and paste the issue description, resolution,
and/or mySupport URL (depending on what is enabled in the Knowledge Management
configuration screen) into the incident. If you open a knowledge
entry from the view frame you can select Knowledge | ![]() Capture Solution in that entry.
Capture Solution in that entry.
If configured, a Short Description field may appear for entering an abbreviated description of the incident.
Use the Description field to enter a detailed description of the incident. Note that the content in the Description field may be sent to customers in an email notification regarding the incident, depending on options set in the Configuration module.
If an incident is created from an email submission, the subject line and body of the email are placed in the Description field. A link to the correspondence is included in the Correspondence History, and attachments are placed on the Attachments tab of the correspondence. If there is an alternate version of the body of the email (created by the email application), if configured it will be saved as a document and placed on the Attachments tab of the correspondence.
If an existing incident number is included in the subject or body of the email, depending on configuration settings, an incident may be created or the incident may be updated with a notation and correspondence link in the Audit History field. The link will indicate whether any files were attached to the correspondence. An email may be sent to the sender's email address acknowledging receipt of the email, and email may be sent to the assignee of the updated incident. The email will contain a link to the updated incident.
Use the Resolution field to enter a detailed description of the resolution, including the steps or processes involved. This field is required in order for an incident to be closed.
If AI integration
is enabled, an AI
icon is included on the text
editor toolbar. You will be able to select from a list
of AI Editor prompts for actions such as fixing the
grammar, formalizing the text, elaborating or shortening the text, and
more. You
can use the Generate button to place the generated text in the top portion
of the dialog, and use the
Insert button to replace the generated
text in the applicable field.
If
enabled, you can use the Custom Prompt option to enter your own prompt.
To route an incident, select Incident | Actions | ![]() Route or the Assignee link. You can also route one or more incidents via
the Desktop. Select the method to use for routing the incident; depending
on how routing is configured, a list of groups, locations, or support
representatives will appear for selection. See Selecting
an Assignee for more information. Select
Route or the Assignee link. You can also route one or more incidents via
the Desktop. Select the method to use for routing the incident; depending
on how routing is configured, a list of groups, locations, or support
representatives will appear for selection. See Selecting
an Assignee for more information. Select ![]() Details
and then select the View Rep Details link to view information about the
assignee. A routing comment dialog may be configured for entering a note
to be included in a routing notification.
Details
and then select the View Rep Details link to view information about the
assignee. A routing comment dialog may be configured for entering a note
to be included in a routing notification.
If ticket acknowledgements are enabled in configuration, an alert bar will appear at the top of the screen for the new assignee. When the assignee selects Acknowledge, an entry will be recorded in the Audit History field and an acknowledgement notification will be sent if configured.
Custom fields may be configured for entering information specific to your company. Custom fields can be configured to always appear or appear when a certain category is selected. You may be required to enter information in custom fields, and if an incident is recategorized, data saved in custom fields is retained and the custom fields associated with the newly-selected category set are added.
Incident templates populate
fields with information set up during configuration. Templates can
be configured to append or replace the text in the Short Description,
Description, and/or Resolution fields. To use an incident template, select
Incident | Actions |  Templates. See Using Templates for more information.
In addition to populating fields, you can use incident
hierarchy templates to track and manage tasks that have multiple
activities. To use a hierarchy template in the Incident screen, select
Incident | Use Hierarchy Template or the Use Hierarchy Template ![]() icon. Use either the Related Hierarchy field (if configured) or the
icon. Use either the Related Hierarchy field (if configured) or the ![]() View Related icon (which displays
a dialog) to display the incidents created by the template hierarchy.
View Related icon (which displays
a dialog) to display the incidents created by the template hierarchy.
![]() Click for Details appears
next to each open and closed incident for displaying incident details.
See Using Incident Hierarchy Templates for more information.
Click for Details appears
next to each open and closed incident for displaying incident details.
See Using Incident Hierarchy Templates for more information.
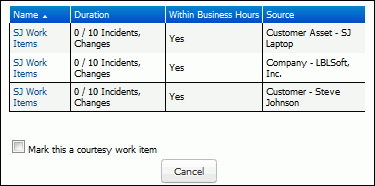
Service Contract functionality tracks and restricts incidents and changes for customers, companies, and/or assets. Contracts can be based on work item count (a specified number of incidents and/or changes), hourly count (a specified number of hours), duration (time frame in days), or a combination (limiting the number of incidents and/or changes within a specified daily time frame). If you have the Service Desk edition, Service Contract functionality is enabled in configuration, and a service contract is associated with the selected customer, customer’s company, or customer’s asset selected for the incident, the Select Service Contract dialog will appear. Select the service contract to which the incident should be applied or select the Mark This a Courtesy Work Item checkbox (if configured) if you do not wish to count the incident against a contract. If you selected a contract, the change will be counted against it when the record is initially saved.
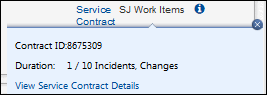
After selecting a contract, the contract name appears in the Service
Contract field. You can select ![]() Details to display the
contract ID and duration. You can select the View
Service Contract Details link to display the contract
in the Service Contract screen.
Details to display the
contract ID and duration. You can select the View
Service Contract Details link to display the contract
in the Service Contract screen.
To send an email from the Incident
screen, you can select New |  Correspondence or the
Email icon in the customer information section (if configured) to populate
the To field with the customer’s email address. You can select
Correspondence or the
Email icon in the customer information section (if configured) to populate
the To field with the customer’s email address. You can select ![]() Details next to the Assignee field and then
select the Email link to populate the To field with the assignee’s email
address. If AI integration is enabled, an incident summary can be
appended to the end of a correspondence message by selecting the AI Incident
Summary
icon from the Correspondence toolbar. It will appear above the rep’s signature
if configured in their Desktop Preferences. See Sending Correspondence
for more information.
Details next to the Assignee field and then
select the Email link to populate the To field with the assignee’s email
address. If AI integration is enabled, an incident summary can be
appended to the end of a correspondence message by selecting the AI Incident
Summary
icon from the Correspondence toolbar. It will appear above the rep’s signature
if configured in their Desktop Preferences. See Sending Correspondence
for more information.
You can schedule one or more
tickets to be created with an open status at a future date/time; you must
complete the scheduling dialog before the ticket has been saved. Select
Incident | Actions | ![]() Schedule to
display the Scheduling dialog. See Scheduling Tickets
for more information.
Schedule to
display the Scheduling dialog. See Scheduling Tickets
for more information.
If enabled in configuration, you can use the Others to Notify feature to set up a list of customers and/or support representatives to be sent event notifications and other correspondence. See Selecting Others to Notify for more information. If configured, a customer can add to an Others to Notify list when submitting an incident via the mySupport portal.
Rules can be configured to automatically perform actions when conditions are met upon save of a record or after a certain time interval. Actions can include changing incident field values, routing via load balancing or the round robin method, sending notifications, initiating an approval cycle, and posting data to a web application. Rules are included in rule groups that are applied to incidents through customers, companies, category combinations, and incident and hierarchy templates; a default rule group will apply if none are applicable. When an incident is saved, the matching rule group is first determined and then all rules in that matching rule group are evaluated. If a rule’s conditions are met, its actions are performed.
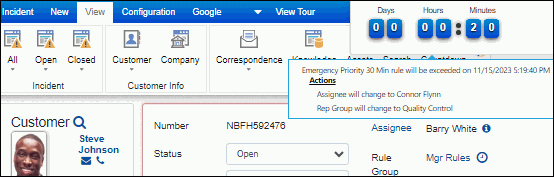
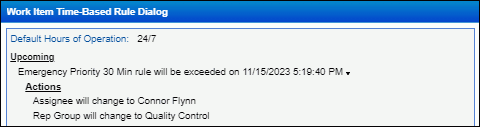
Select the name of the rule group in the Rule
Group field to display the Time-Based
Rule Group dialog with actions that will be and have
been taken by any time-based rules in the current rule group. Note that
entries will include the term "fulfilled" if a rule is
invalidated or reset due to a change in rule configuration. Time frames
reflect the assignee’s support center time zone; the actual action dates
and times will depend on execution of the Time-Based Rule agent. Select
 Countdown icon to display a dialog
containing a countdown clock with the time remaining until the next action.
If a pending time-based rule has not been exceeded, a blue countdown clock
will appear; if the time-based rule has been exceeded, a red countdown
clock will appear and the numbers will increment to display the amount
of time that has passed since the time at which the rule was last exceeded.
Use the Show Seconds on Countdown field in the Preferences screen to control
display of the Seconds portion of the countdown clock.
Countdown icon to display a dialog
containing a countdown clock with the time remaining until the next action.
If a pending time-based rule has not been exceeded, a blue countdown clock
will appear; if the time-based rule has been exceeded, a red countdown
clock will appear and the numbers will increment to display the amount
of time that has passed since the time at which the rule was last exceeded.
Use the Show Seconds on Countdown field in the Preferences screen to control
display of the Seconds portion of the countdown clock.
To display all actions that have been performed
by rules, use the  Rule option
in the History field.
Rule option
in the History field.
The History field includes notations on all incident actions. To enter
information on any activities related to resolving the incident, select
Incident |  Add History or the
  Add Work History icon in the History field. See Entering
and Viewing History for more information.
Add Work History icon in the History field. See Entering
and Viewing History for more information.
If configured, a question with two response choice image links can be included in an incident notification; when a customer receives the email and selects one of the responses, configured submission text will appear on a page on the mySupport portal, and the feedback question and response will be included in the Feedback field on the incident.
If asset functionality is enabled during configuration, associate an
existing asset by selecting Incident | ![]() Add Asset or the Add link in the Assets field. You can select New |
Add Asset or the Add link in the Assets field. You can select New | ![]() Asset to create a new asset record
from the Incident screen but you’ll need to select Incident |
Asset to create a new asset record
from the Incident screen but you’ll need to select Incident | ![]() Add Asset to associate it. You can display the customer’s or company’s
assets, all assets, or assets with an asset type that has count tracking enabled.
Add Asset to associate it. You can display the customer’s or company’s
assets, all assets, or assets with an asset type that has count tracking enabled.
Asset scans collect hardware, software, and service details automatically on a computer (Windows 98 and above or any other WMI-compliant machine; WMI must be installed and active) and on non-Windows devices on your local subnet. There are two types of scans in iSupport:
You can perform a dynamic asset scan from the Incident, Problem, Change, or Asset screen.
Scheduled asset scans can be scheduled and run automatically according to an Asset Scanning and Monitoring definition, which defines the hosts (remote machines) to be scanned during a specified start time and duration. Scheduled scans include a more comprehensive set of data than dynamic scans.
To perform the scan, you will need to enter IP address or NetBIOS name of the machine to be scanned. The login used to run the scan must be in the Administrators group on the machine to be scanned. If you do not have this login, it can be set during configuration and accessed automatically by iSupport.
To initiate a scan, select New |  Scan or the New Scan link in the Scans field. See Performing
Asset Scans for more information.
Scan or the New Scan link in the Scans field. See Performing
Asset Scans for more information.
Use the Add Existing link in the Associated Work Items field to associate an existing knowledge entry, headline, problem, change (if enabled), or purchase request/order with the incident. If configured, notifications regarding incident events can be sent to customers of associated items. (Note that only one Problem record can be associated with an incident.) To associate new work items:
Select
New | Associated Work Item |  Problem or select Add New Problem in the Associated Work Items field
to create a new Problem record that will be associated with the incident.
The categorization and description from the incident will be included
in the corresponding fields on the record.
Problem or select Add New Problem in the Associated Work Items field
to create a new Problem record that will be associated with the incident.
The categorization and description from the incident will be included
in the corresponding fields on the record.
Select
New | Associated Work Item |  Change or select Add New Change in the Associated Work Items
field to create a Change record that will be associated with
the incident. The categorization and description from the incident
will be included in the corresponding fields on the record.
Change or select Add New Change in the Associated Work Items
field to create a Change record that will be associated with
the incident. The categorization and description from the incident
will be included in the corresponding fields on the record.
Select New | Associated Work Item
|  Purchase or select Add New Purchase in the Associated
Work Items field to create a new purchase request that will be associated
with the incident. The text in the Description field will be included
in the Comments field on the purchase request.
Purchase or select Add New Purchase in the Associated
Work Items field to create a new purchase request that will be associated
with the incident. The text in the Description field will be included
in the Comments field on the purchase request.
Select New | Other | Knowledge Entry
 or Add New Knowledge Entry in the Associated
Work Items field to create a new knowledge entry that will be associated
with the incident. The description, resolution, and categorization
from the incident will be included in the corresponding fields on
the knowledge entry. The current incident will be included in the
Associated Work Items field as well.
or Add New Knowledge Entry in the Associated
Work Items field to create a new knowledge entry that will be associated
with the incident. The description, resolution, and categorization
from the incident will be included in the corresponding fields on
the knowledge entry. The current incident will be included in the
Associated Work Items field as well.
Select New | Other | Headline  or Add New Headline in the Associated Work Items field
to create a new headline that will be associated with the incident.
On the headline, the text in the Short Description field will be included
in the Message field and the text in the Description field will be
included in the Details field. The current incident will be included
in the Associated Work Items field as well.
or Add New Headline in the Associated Work Items field
to create a new headline that will be associated with the incident.
On the headline, the text in the Short Description field will be included
in the Message field and the text in the Description field will be
included in the Details field. The current incident will be included
in the Associated Work Items field as well.
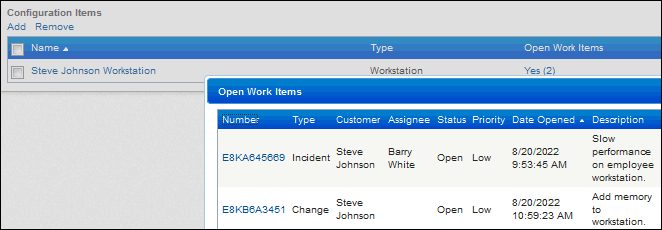
If you have the Service Desk edition, you can select the Add link in the Configuration Items field to associate a predefined configuration item with the incident. Use this feature to track impact on business-critical items, select the item to display the Configuration Item screen for viewing the item’s relationships with other items, and include information on associated configuration items in views, reports, and correspondence. If the configuration item has other open incidents, problems, or changes associated with it, “Yes” will appear along with the number of open work items. Select the link to display a list of those items.
Use options on the View menu to display information on:
![]() Open, closed,
or all incidents for the asset,
category, customer, or the customer’s company, location, or department.
Open, closed,
or all incidents for the asset,
category, customer, or the customer’s company, location, or department.
![]() The selected customer’s profile
record and the profiles of additional customers.
The selected customer’s profile
record and the profiles of additional customers.
![]() The company profile associated
with the selected customer.
The company profile associated
with the selected customer.
![]() All correspondence sent for the
problem or the Customer Profile screen and all correspondence sent to
the customer from the current incident.
All correspondence sent for the
problem or the Customer Profile screen and all correspondence sent to
the customer from the current incident.
![]() Knowledge
entries that have same categorization as the incident.
Knowledge
entries that have same categorization as the incident.
![]() The assets selected for the incident
or all of the customer’s assets.
The assets selected for the incident
or all of the customer’s assets.
 Routing/time statistics, including
the number of times the incident has been routed, total time by status
and priority, and the amount of time the incident has been assigned to
each assignee.
Routing/time statistics, including
the number of times the incident has been routed, total time by status
and priority, and the amount of time the incident has been assigned to
each assignee.
 The call script associated with
the category selected for the incident.
The call script associated with
the category selected for the incident.
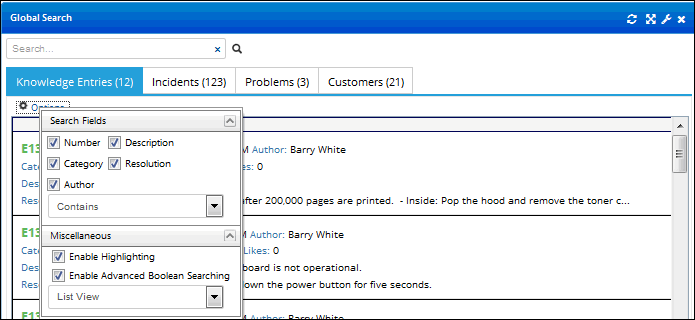
Use the Global Search ![]() icon
to search knowledge, incidents, problems, changes, and FAQs using keywords
and, if searching knowledge, Boolean operators (And, Or, Not as well as
parenthesis to group words and phrases). You can include Google in the
search if configured in the Options and Tools | Integrate | Google Integration
screen. In the Global
Search dialog, select
icon
to search knowledge, incidents, problems, changes, and FAQs using keywords
and, if searching knowledge, Boolean operators (And, Or, Not as well as
parenthesis to group words and phrases). You can include Google in the
search if configured in the Options and Tools | Integrate | Google Integration
screen. In the Global
Search dialog, select  settings
to select incident fields for narrowing the search. Use the Options link
on each tab to select the fields to search, the type of search (Starts
With, Contains, Ends With and Is), enable text highlighting, select the
type of view in which search results are displayed (list or classic),
and sort options.
settings
to select incident fields for narrowing the search. Use the Options link
on each tab to select the fields to search, the type of search (Starts
With, Contains, Ends With and Is), enable text highlighting, select the
type of view in which search results are displayed (list or classic),
and sort options.  iSupport Global Search
To attach a file to the incident, select Add in the Attachments field and select the file. You can select the Show Correspondence Attachments checkbox to display attachments from all sent or received correspondence (including attachments from an inbound email update) associated with the incident. If the incident was created via a chat or a chat was initiated while the incident was open, use the Show Chat Attachments checkbox to display any files attached during the chat. A Copy button will be included next to correspondence and chat attachments; you can use it to directly associate the attachment to the incident.
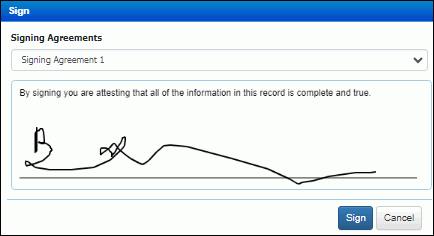
Use the  Sign feature to display a dialog
for signing using a touch screen or mouse. Select the signing agreement
applicable to the incident; this text is set up in configuration and can
be associated with customer and support representative groups, categories,
and incident and change templates. The signature image and text will be
saved as a .png file and included as an attachment.
Sign feature to display a dialog
for signing using a touch screen or mouse. Select the signing agreement
applicable to the incident; this text is set up in configuration and can
be associated with customer and support representative groups, categories,
and incident and change templates. The signature image and text will be
saved as a .png file and included as an attachment.
Approval cycles require incidents to be approved by designated approvers before most incident functions can be performed. See Using Approval Cycles for more information.
If an approval cycle is in effect, an alert bar will appear at the top of the Incident screen after an incident is saved and most of the incident fields will be disabled. (However, you can send correspondence and update work history.) An action drop-down field will appear in the approval alert bar if you are the current approver in the approval cycle or if you have permission to override approvals. See Specifying a Verdict for more information.
To initiate an approval cycle, select Incident | Initiate Ad Hoc Approval after saving the incident. A dialog will appear with the approval cycles designated as available for ad hoc use. The cycle will be enabled after the Initiate button is selected.
Use the Approvals tab to view a graphic display of the approvers and status of each approval in the approval process. See Viewing Approval History for more information.
You can create related incidents to associate and track related tasks and requests. For example, for an incident regarding an maintenance on a printer, you could create a related incident for ordering more toner for the printer. You can close all related incidents when you close the original incident.
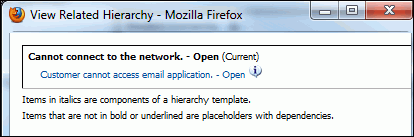
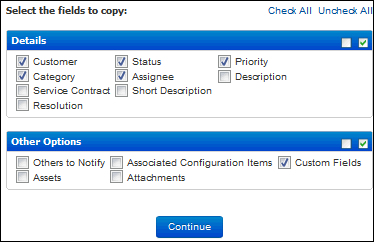
To create a related incident, select New | ![]() Related
Incident from a saved incident. The
Select the Fields to Copy dialog appears; select the
fields to populate with data from the original incident. Complete the
fields and save the incident. Then save the original incident. Hierarchies
can be displayed via either the Related Hierarchy field (if configured)
or the
Related
Incident from a saved incident. The
Select the Fields to Copy dialog appears; select the
fields to populate with data from the original incident. Complete the
fields and save the incident. Then save the original incident. Hierarchies
can be displayed via either the Related Hierarchy field (if configured)
or the ![]() View Related icon (which
displays a
dialog). A
View Related icon (which
displays a
dialog). A ![]() Click for
Details icon appears next to each open and closed incident for displaying
incident details.
Click for
Details icon appears next to each open and closed incident for displaying
incident details.
If you open a related incident and then create and save another related incident, a hierarchy would be created. In iSupport, a structure created in this manner is called a dynamic hierarchy because you can add and delete incidents as needed.
You can also relate multiple incidents via the Desktop; After selecting the incidents in an incident view and selecting Relate in the view Action menu, the Select Upper Level Incident dialog will appear for you to select the incident that will be a level above your previously selected incidents. The Lower Level Incident Options dialog will appear for you to enable custom values to be copied from the selected upper level incident and apply a template to selected lower level incidents if applicable.
When you delete a change in a dynamic hierarchy, you will have the option of deleting its lower level incidents. See Adding, Removing, and Deleting Incidents in a Dynamic Hierarchy for more information.
When you close an incident with one or more lower level related incidents, a prompt will appear for closing the related incidents. If you select OK, the resolution will be appended to any existing resolution in the lower level incidents and the lower level incidents will be closed. If you select Cancel, the lower level incidents will remain open. If a structure contains both a dynamic hierarchy and a hierarchy template structure, actions of the incidents in the dynamic hierarchy do not affect the incidents in the hierarchy template structure above it. See Closing Incidents in a Template Hierarchy for more information.
If iSupport’s Survey functionality is configured and you have appropriate
permissions, select New | ![]() Survey to send a survey
to the customer assigned to the incident. The Send
Survey dialog appears; the survey will be sent after
you select a survey. See Sending
a Survey for more information.
Survey to send a survey
to the customer assigned to the incident. The Send
Survey dialog appears; the survey will be sent after
you select a survey. See Sending
a Survey for more information.
If configured, the Awareness feature
displays  Connected Rep and alert in the upper right
corner of the screen if two or more support representatives have the same
record open. You can select the icon to display the support representative(s)
viewing the work item and initiate a chat by selecting their name.
Connected Rep and alert in the upper right
corner of the screen if two or more support representatives have the same
record open. You can select the icon to display the support representative(s)
viewing the work item and initiate a chat by selecting their name.
If configured, a  New Meeting icon will appear for
scheduling a scheduling
a Microsoft® Office Outlook® calendar and/or Google Calendar meeting.
You can view the schedules of meeting attendees, create a meeting, and
configure a notification to be sent to meeting attendees. Use the View
| Meeting icon to view scheduled meetings.
New Meeting icon will appear for
scheduling a scheduling
a Microsoft® Office Outlook® calendar and/or Google Calendar meeting.
You can view the schedules of meeting attendees, create a meeting, and
configure a notification to be sent to meeting attendees. Use the View
| Meeting icon to view scheduled meetings.
If configured, icons may appear for scheduling meetings: ![]() Microsoft Teams ,
Microsoft Teams , ![]() Zoom ,
Zoom , ![]() Google Meet. When the icon is
selected, a Generate Join URL dialog will appear with options for entering
the topic, sharing the Join URL, and emailing a link to the meeting. The
Share Join URL option will display a dialog with the URL and an option
to start the meeting; the Email Link option will display the Correspondence
dialog. You can also select
Google Meet. When the icon is
selected, a Generate Join URL dialog will appear with options for entering
the topic, sharing the Join URL, and emailing a link to the meeting. The
Share Join URL option will display a dialog with the URL and an option
to start the meeting; the Email Link option will display the Correspondence
dialog. You can also select ![]() Planner
Task to access Microsoft Planner and create tasks with prefilled references
to the iSupport work item number.
Planner
Task to access Microsoft Planner and create tasks with prefilled references
to the iSupport work item number.
Select a Closed status in the Status field to close an incident. If configured and the support representative has permission, a prompt will appear for creating a knowledge entry using the categorization, issue description, and issue resolution. The knowledge entry will have a status of Pending Approval. After the incident status has been changed to Closed, the Reopen option will appear on the Incident menu for reopening the incident.