Using the Asset Screen Using the Asset Screen
![]() Common Entry
Screen Features
Common Entry
Screen Features ![]() Using the iSupport Asset
Screen
Using the iSupport Asset
Screen
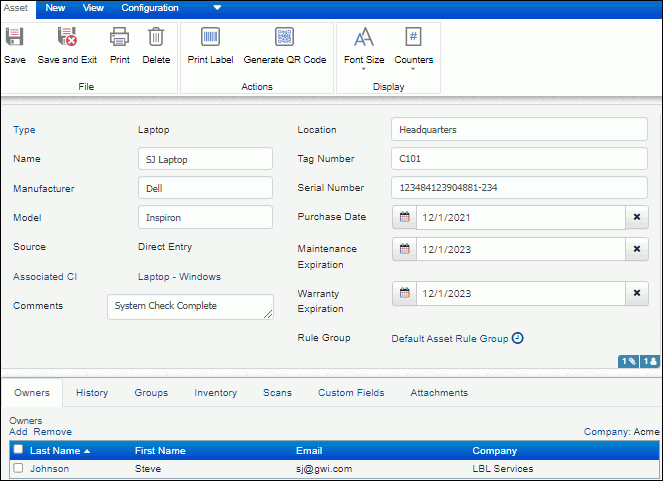
Asset functionality enables you to collect and record information about any type of item. This information can be associated with a customer and pulled into an incident, problem or change (if enabled), or purchase request. Use the Asset entry screen to create Asset records for a specific item with purchase and identification information. You can also use the Multiple Asset Creation Wizard to create multiple asset records at one time.
To access the Asset entry screen, select Asset on the Desktop ![]() Create menu. The Select Asset Type dialog
appears; select the applicable asset type. Asset types track information
on similar assets (for example, printers, laptops, furniture). Custom
fields and fields such as Owner, Tag Number, and Location can be configured
to display in the Asset screen when the asset type is selected.
Create menu. The Select Asset Type dialog
appears; select the applicable asset type. Asset types track information
on similar assets (for example, printers, laptops, furniture). Custom
fields and fields such as Owner, Tag Number, and Location can be configured
to display in the Asset screen when the asset type is selected.
The fields and layout in the Asset screen are determined by asset types, and fields or functionality may not display if disabled or disallowed due to permissions set during configuration. The following sections contain information on all asset fields.
Name |
Enter the name of the asset. |
Type |
The selected asset type appears; click this link to change it. |
Tag Number Location Serial Number Model Purchase Date Manufacturer Comments |
One or more of these fields may appear depending on the asset type. |
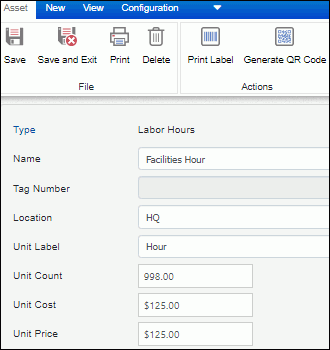
Unit Count Unit Label Unit Cost Unit Price |
These fields will appear if count tracking is enabled for the selected asset type. In the Unit Count field, enter the total number of units to be tracked for the asset. When an asset with the specified type is selected in the Incident, Problem, or Change screen, a support representative with the Edit Used Count permission can enter the number of units used and decrement the unit count. A notification can be configured to be sent when a specified count is reached. In the Unit Label field, enter a name describing one unit. Use the Unit Cost and Unit Price to enter the cost and price for one unit. If a Product record with a count-enabled Asset type is selected on a purchase request and the flag to create an asset (when all items are received) is enabled, the received count will be added to the Asset Wizard for creating the Asset record. |
Maintenance Expiration Date |
This field will appear if maintenance tracking is enabled for the specified asset type. Enter the date on which the maintenance contract ends. Expiration notifications may be configured to be sent before this date. |
Warranty Expiration Date
|
This field will appear if warranty tracking is enabled for the specified asset type. Enter the date on which the warranty ends. Expiration notifications may be configured to be sent before this date. |
If the Owners field is configured to display for the asset type, click the Add link to assign one or more owners to the asset. You can also click the Company link to associate a company with the asset; this enables targeted customer and asset lookups when you create an incident while viewing a saved Asset, Customer Profile, or Company record. (Note that only one company can be associated with an asset.) A prompt will appear for adding the company’s customers added to the Owners field.
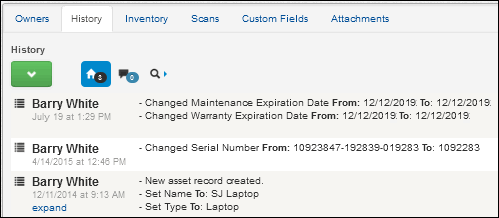
After you save an asset record, an entry appears on the History field. See Entering and Viewing History for more information.
Rules can be configured to automatically perform actions when conditions are met upon save of a record or after a certain time interval. Actions can include changing Asset record field values, sending notifications, and posting data to a web application. Rules are included in rule groups that are applied to Asset records through asset types; a default rule group will apply if none are applicable. When an Asset record is saved, the matching rule group is first determined and then all rules in that matching rule group are evaluated. If a rule’s conditions are met, its actions are performed.
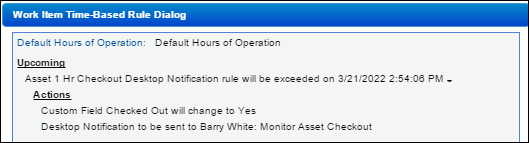
Click the name of the rule group in the Rule
Group field to display the Time-Based
Rule Group dialog with actions that will be and have
been taken by any time-based rules in the current rule group. Note that
entries will include the term "fulfilled" if a rule is
invalidated or reset due to a change in rule configuration. Action dates
and times will depend on execution of the Time-Based Rule agent. Select
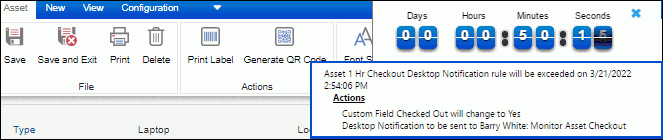
 Countdown to display a dialog
containing a countdown clock with the time remaining until the next action.
If a pending time-based rule has not been exceeded, a blue countdown clock
will appear; if the time-based rule has been exceeded, a red countdown
clock will appear and the numbers will increment to display the amount
of time that has passed since the time at which the rule was last exceeded.
Use the Show Seconds on Countdown field in the Preferences screen to control
display of the Seconds portion of the countdown clock.
Countdown to display a dialog
containing a countdown clock with the time remaining until the next action.
If a pending time-based rule has not been exceeded, a blue countdown clock
will appear; if the time-based rule has been exceeded, a red countdown
clock will appear and the numbers will increment to display the amount
of time that has passed since the time at which the rule was last exceeded.
Use the Show Seconds on Countdown field in the Preferences screen to control
display of the Seconds portion of the countdown clock.
To display all actions that have been performed
by rules, select  Rule in the
History field.
Rule in the
History field.
This tab appears if you have the Service Desk edition and Service Contract functionality is enabled in configuration. Use Service Contract functionality to track and restrict incidents and changes for customers, companies, and/or assets. Contracts can be based on work item count (a specified number of incidents and/or changes), hourly count (a specified number of hours), duration (time frame in days), or both (limiting the number of incidents and/or changes within a specified daily time frame). On the Service Contracts field, click the New link to create a new service contract and assign it to the asset, click the Add link to assign the existing contract to the asset, or click the Remove link to remove the assignment.
If applicable, click the Associated Configuration Item link to select a configuration item to associate with the asset. If assets are configured to be an associated item for a configuration item type, the configuration items of that type will appear in the Select Associated Configuration Item dialog. You can include information on associated configuration items in views, reports, and correspondence.
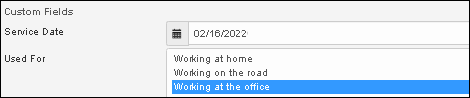
If custom fields have been set up for the specified asset type and/or for the Asset screen, the fields will appear in custom fields. You may be required to enter information in these fields.
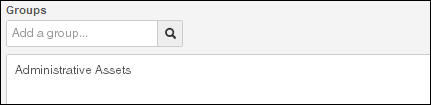
Asset groups enable you to associate assets for viewing and reporting. If you have Asset | Editor | Edit permission, you can add an asset to a group or remove an asset from a group. This can also be accomplished for selected assets on the Desktop. To assign the asset to an asset group, place your cursor in the Add a Group... field and select from the predefined groups that appear.
An asset group may be configured with group access restrictions; this allows only those in the related support representative group to edit Asset records in the asset group (or any other asset record not included in an asset group). If configured, a support representative can select only his/her groups to add to an asset. Other unrelated groups could be present on an existing asset; these unrelated groups could be removed but not added.
If configured, the Awareness
feature displays  Connected Reps and an alert in the
upper right corner if two or more support representatives have the same
record open. You can click the icon to display the support representative(s)
viewing the work item and initiate a chat by clicking on their name.
Connected Reps and an alert in the
upper right corner if two or more support representatives have the same
record open. You can click the icon to display the support representative(s)
viewing the work item and initiate a chat by clicking on their name.
If configured, ![]() New Meeting
may appear in the Asset screen for scheduling
a Microsoft® Office Outlook® calendar and/or Google Calendar meeting.
You can view the schedules of meeting attendees, create a meeting, and
configure a notification to be sent to the meeting attendees.
New Meeting
may appear in the Asset screen for scheduling
a Microsoft® Office Outlook® calendar and/or Google Calendar meeting.
You can view the schedules of meeting attendees, create a meeting, and
configure a notification to be sent to the meeting attendees.
To attach a file to the asset record, click on the Browse button in the Attachments field, select the file, and click OK. The file name appears in the Attachment field. Click the Add button to add the file to the list. You can click the Show Chat Attachments checkbox to display attachments added when a chat is initiated with another support representative while the Asset record is open.
To perform a scan in the Asset or Incident screen, you can select New
|  Scan or click the New Scan link in the Dynamic
Scans field. See Performing Asset Scans
for more information.
Scan or click the New Scan link in the Dynamic
Scans field. See Performing Asset Scans
for more information.
Scheduled scans can be scheduled and run automatically according to a configured scheduled scan definition. To select an existing scheduled scan to be associated with the asset record, click the Scheduled Scan Source link in the Scheduled Scans field in the Asset screen. The Select Scheduled Scan Source dialog appears with a list of all of the systems on which a scheduled scan has been performed; select a system to display the scheduled scans that have run against the selected machine (up to 15 of the most recent scans) on the Scheduled Scans tab.
Click here for information on scanning bar codes and printing bar code labels.
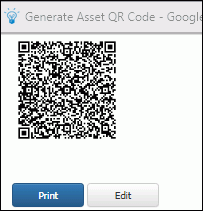
Select the Generate QR code option in the toolbar to generate a QR code that contains a link that will display information about the record. Select the fields to include for the code in the Generate QR Code dialog and then select Generate; the QR code will appear. You can print it or click the Edit button to redisplay the fields for selection.
You can also use the QR code to add an asset to an incident, problem, or change via the mobile interface, but note that the QR code reader option for selecting an asset in the HTML5 mobile interface will be hidden if using an Android device.