Asset
Feature and Configuration Overview
Asset
Feature and Configuration Overview
![]() Configuring
iSupport Asset Functionality
Configuring
iSupport Asset Functionality
Core configuration options for Asset functionality include setting up asset types with fields and notifications for tracking similar assets (for example, printers and laptops).
Select Create on the Asset Management | Types tab in Feature Basics to configure custom fields and fields such as Owner and Tag Number to display when the asset type is selected, as well as maintenance and warranty notifications. In the Asset Types list screen, use the Show Pending Deletion link to display records that have been deleted by an iSupport user but are retained in the system because of references to other records (incidents, correspondence, etc.). The Database Maintenance agent ultimately removes these records.
Use the Agents tab to schedule agents for sending maintenance/warranty and count tracking notifications, as well as initiating scheduled scans and creating asset records from those scans if applicable.
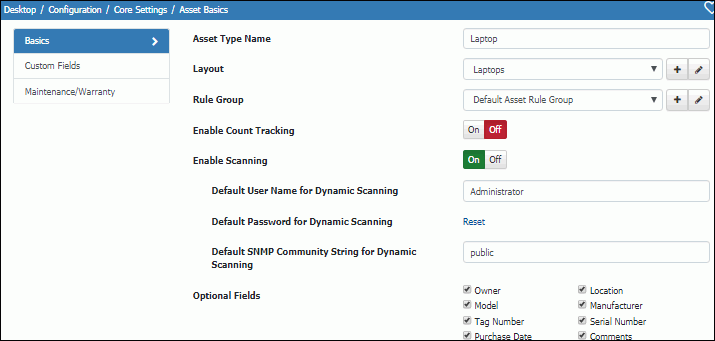
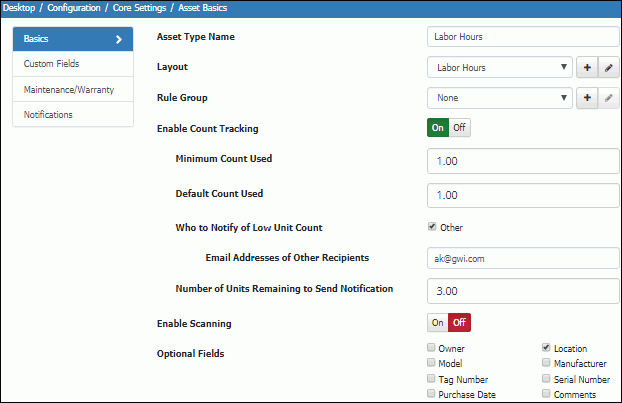
Use the Basics tab in the Asset Type screen to set up asset types, enter a login for running asset scans, and set up optional and custom fields.
Asset Type Name |
Enter the name of the asset type. Asset types classify similar assets and enable custom and optional fields to display when recording information about an asset. |
Layout |
Select the layout containing the fields and tabs that will display when the type is selected in the Asset screen. Asset layouts are configured in the Options and Tools | Customize | Layouts screen. |
Rule Group |
Select the Asset rule group that will take effect when an Asset record with the asset type is saved. Asset rules perform actions when specified conditions based on Asset record fields or events are met; these actions can include changing a field value, executing a webhook, and sending a notification via SMS, Desktop, or email. |
Enable Count Tracking |
Select Yes to enable Unit Count, Unit Label, Unit Cost, and Unit Price fields to appear in the Asset screen if the type is selected. When an asset with the specified type is selected in the Incident, Problem, or Change screen, a support representative with the Edit Used Count permission can enter the number of units used and decrement the unit count. A Low Unit Count notification can be configured to be sent when the minimum unit count is reached; it is sent on the schedule of the Asset Unit Count Tracking agent. Additional fields for configuring count tracking appear. |
Minimum Count Used |
Enter the minimum amount that can be entered in the Count Used field in the Update Asset Counts dialog. |
Default Count Used |
Enter the amount to appear by default in the Count Used field in the Update Asset Counts dialog. |
Who to Notify of Low Unit Count
Email Addresses of Other Recipients |
If enabling count tracking, select the person to whom the Low Unit Count notification should be sent:
Use the Notification tab to configure this notification. Be sure to enable the Asset Unit Count Tracking agent; it checks unit counts and send notifications when the minimum is reached. |
Number of Units Remaining to Send Notification |
Enter the count (of total units remaining) at which the low unit count notification should be sent. |
Enable Scanning |
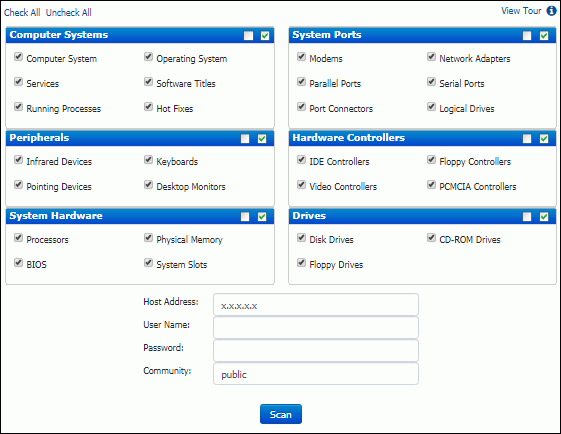
Select Yes if asset scans will be performed on assets assigned this asset type. Asset scans can be performed on a computer with Microsoft Windows® 98 and above; WMI must be installed and active. |
Default User Name for Dynamic Scanning Default Password for Dynamic Scanning |
If asset scans are enabled, enter the user name and password to be used for accessing the machine to be scanned. This login will be validated by the WMI process of the target machine in order to return the requested data. Traditionally, the login must be a member of the Administrators group of the machine to be scanned, but permissions may be modified to a different structure. When a dynamic scan is initiated, the Dynamic Asset Scan dialog appears. If you have set up a default user name and password for the selected asset type, the support representative can select Yes in the Use Default Credentials checkbox to use this default user name and password. If No is selected in the Use Default Credentials field, the User Name and Password fields will be enabled for entering a login. Note: If a login is used to access a Microsoft Windows XP machine, a profile and a folder are created in the Documents and Settings folder. |
Default SNMP Community String for Dynamic Scanning |
If you wish to track non-Windows devices on your local subnet, enter the SNMP community string (a text string that acts as a password for a network device). Community strings are configured by administrators of network devices that support SNMP to allow varying levels of access to the devices configuration and operational settings; this grants management tools read-only access to the remote device. The default community string for read-only access to network devices is normally the word "public". |
Use the Optional Fields section to enable Owner, Model, Tag Number, Purchase Date, Location, Manufacturer, Serial Number, and Comments fields to display in the Asset screen when the asset type is selected. You can control display of the Comments field for customers using mySupport work item submission via the Configure Field icon in the mySupport Layouts screen.
In the Custom Fields section, click the Add link to set up a custom field that will display in the Custom Fields section when the asset type is selected in the Asset screen.
Use the Maintenance/Warranty tab to set up tracking of maintenance and warranty expiration dates. Expiration notifications are enabled on the Notifications tab. If you enable maintenance and/or warranty expiration functionality, be sure to enable the Asset Reminder agent.
Track Maintenance Information |
Select Yes to enable maintenance notification functionality, which sends notifications when a maintenance expiration date is near. |
Who to Notify of Maintenance Expiration Email Addresses of Other Recipients |
If tracking maintenance information, select the person to whom the maintenance expiration reminder email should be sent:
Use the Notification tab to configure this notification. |
Number of Days After Asset Creation to Default Maintenance Expiration Date |
Enter the number of days after the asset record is created to display as default for the maintenance expiration date. |
Number of Days Prior to Maintenance Expiration to Send Reminder |
Enter the number of days before the expiration date in which the maintenance notification should be sent. |
Track Warranty Information |
Select Yes to enable warranty notification functionality, which sends notifications when a warranty expiration date is near. |
Who to Notify of Warranty Expiration Email Addresses of Other Recipients |
If tracking warranty information, select the person to whom the warranty expiration reminder email should be sent.
Use the Notification tab to configure this notification. |
Number of Days After Asset Creation to Default Warranty Expiration Date |
Enter the number of days after the asset record is created to display as default for the warranty expiration date. |
Number of Days Prior to Warranty Expiration to Send Reminder |
Enter the number of days before the expiration date in which the warranty notification should be sent. |
The Notifications tab appears if the Who to Notify of Maintenance Expiration, Who to Notify if Warranty Expiration, or Who to Notify of Low Unit Count fields are enabled. You can select the default notification or a predefined custom notification; select Create New Custom Notification to access the Custom Notifications screen to create one.
Maintenance Expiration Reminder |
Select the recipients and notifications to be sent according to the settings on the Maintenance/Warranty tab. The notifications will be sent on the schedule of the Asset Reminder agent. |
Warranty Expiration Reminder |
Select the recipients and notifications to be sent according to the settings on the Maintenance/Warranty tab. The notifications will be sent on the schedule of the Asset Reminder agent. |
Low Unit Count Notification |
Select the recipients and notifications to be sent when the minimum unit count (specified on the Basics tab) is reached. These notifications are sent on the schedule of the Asset Unit Count Tracking agent. |