![]() Common Entry
Screen Features
Common Entry
Screen Features ![]() Using
the iSupport Product and Purchase Screens
Using
the iSupport Product and Purchase Screens
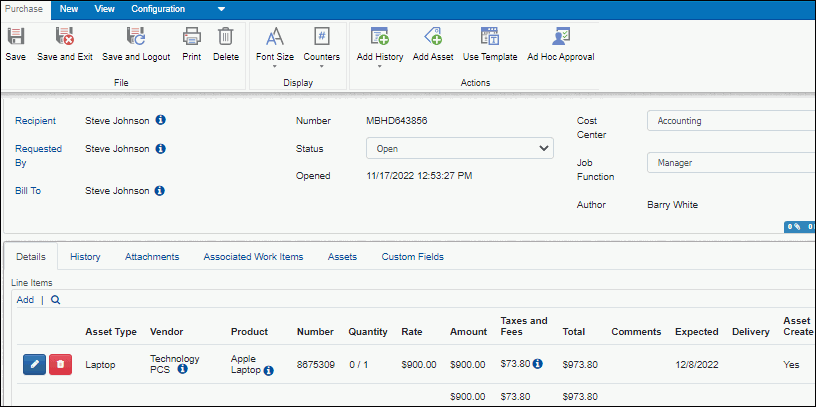
Purchasing functionality enables users to track products and services, submit purchase requests, and associate orders with Incident, Problem, Change, and Asset records. You create Product records using predefined asset types, designate customers, companies, configuration items, and support representatives as vendors, and then associate vendors with products. Purchase requests can also be created via the mySupport portal.
Purchasing functionality can be controlled via approval cycles and support representative permissions, and can include work history charges, custom fields, attachments, and cost center and job function fields for reporting. Asset records can be created from purchase orders when items are received. Templates can be configured for frequent purchase requests.
If an approval cycle is complete and results in an approval or if there is no approval cycle, a purchase request becomes a purchase order after the record is saved. It will be fully editable by those with Edit permission; only the received quantity can be changed by those with no Edit permission. When an item is received, a date is entered in the Delivery field and the quantity is entered before the slash in the Quantity field.
If the Asset Create checkbox is enabled for a line item and all of the expected quantity for a line item is received, Asset records are created for the total quantity. On those Asset records, if a customer is the recipient on the order and the asset type uses the Owner field, the Customer field will be populated. A link to the purchase order will be included in the History section of the Asset record and a link to the newly created Asset records will be included in the History section of the purchase order.
When the expected quantity for all line items has been received, the order can be closed. Closed orders cannot be reopened or edited; at any time, a support representative can set the status to a Closed status even if some items have not been received.
Note: The fields and layout in the Purchase Request screen are set up in the Configuration module. Fields or functionality may not display if disabled or disallowed due to permissions set during configuration. The following sections contain information on all purchasing functionality.
The fields that appear depend on what is configured for the Purchase Request screen.
Predefined asset types with associated vendors and products appear in the product tree view on the left drag applicable product(s) to the frame on the right for inclusion as a purchase request line item. Vendors are associated with products in the Customer Profile, Company, Support Representative, and Product screens.
Count tracking can be enabled for asset types; if a Product record with a count-enabled Asset type is selected on a purchase request and the flag to create an asset (when all items are received) is enabled, the received count will be added to the Asset Wizard for creating the Asset record.
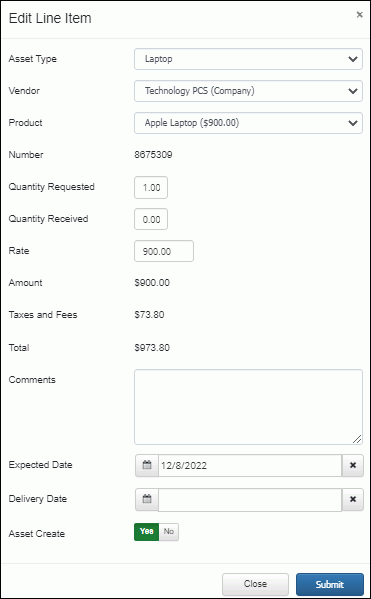
To create a line item for the purchase order, click the Add link. Note that taxes and fees are set up in the Purchase Tax and Fee screen; the charge type can be a rate percentage, a per line item charge, or a per order charge (same fee charged regardless of the quantity specified for a line item). In the Asset Create field, select Yes to create Asset records when line items are received. If a customer is the recipient on the order and the asset type uses the Owner field, those records will be populated with the customer. A link to the purchase order will be included in the History section of the Asset record and a link to the newly created Asset records will be included in the History section of the purchase order.
Charging Time Worked Against Purchase Orders
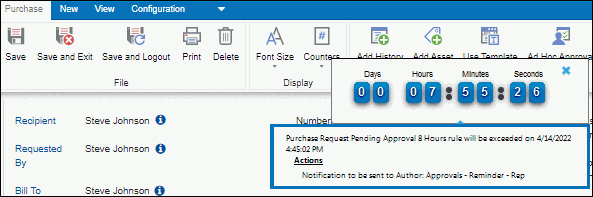
Rules can be configured to automatically perform actions when conditions are met upon save of a record or after a certain time interval. Actions can include changing purchase request/order field values, sending notifications, initiating an approval cycle, and posting data to a web application. Rules are included in rule groups that are applied to purchase requests through customers, companies, and purchase templates; a default rule group will apply if none are applicable. When a purchase request/order is saved, the matching rule group is first determined and then all rules in that matching rule group are evaluated. If a rule’s conditions are met, its actions are performed.
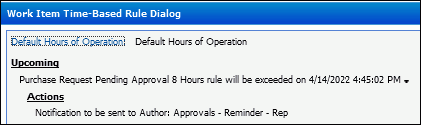
Click the name of the rule group in the Rule
Group field to display the Time-Based
Rule Group dialog with actions that will be and have
been taken by any time-based rules in the current rule group. Note that
entries will include the term "fulfilled" if a rule is
invalidated or reset due to a change in rule configuration. Click the
Countdown  icon to display a dialog
containing a countdown clock with the time remaining until the next action.
icon to display a dialog
containing a countdown clock with the time remaining until the next action.
To display all actions that have been performed
by rules, use the Rule  option in the History field.
To enter information on any activities related to the record, click the Add to Work History icon or link on the History tab or select Purchase | Add to Work History. See Entering and Viewing History for more information.
Custom fields that are specific to your company's environment may be configured; see Completing Custom Fields for more information.
If configured, a New Meeting  icon may appear in the Purchase Request/Order screen for scheduling
a Microsoft® Office Outlook® calendar and/or Google Calendar meeting.
You can view the schedules of meeting attendees, create a meeting, and
configure a notification to be sent to the meeting attendees.
icon may appear in the Purchase Request/Order screen for scheduling
a Microsoft® Office Outlook® calendar and/or Google Calendar meeting.
You can view the schedules of meeting attendees, create a meeting, and
configure a notification to be sent to the meeting attendees.
If configured, the Awareness
feature displays a Connected Reps  icon and alert if two or more support representatives have the same record
open. You can click the icon to display the support representative(s)
viewing the work item and initiate a chat by clicking on their name.
icon and alert if two or more support representatives have the same record
open. You can click the icon to display the support representative(s)
viewing the work item and initiate a chat by clicking on their name.
To attach a file to the Purchase Request/Order record, click on the Add File button on the Attachments tab and select the file. You can select the Show Correspondence Attachments checkbox to display attachments from all sent or received correspondence (including attachments from any inbound email update) associated with the Purchase Request/Order record. If a chat was initiated while the Purchase Request/Order record was open, use the Show Chat Attachments checkbox to display any files attached during the chat. A Copy button will be included next to correspondence attachments; you can use it to directly associate the attachment to the Purchase Request/Order record.
Use the Add Existing link in the Associated Work Items field to associate an existing change, incident, or problem with the purchase request/order. To associate new work items:
Select
New | Associated Work Item |  Problem or select Add New Problem in the Associated Work Items field
to create a new Problem record that will be associated with the purchase
request/order. The text in the Description field will be included in
the Comments field on the record.
Problem or select Add New Problem in the Associated Work Items field
to create a new Problem record that will be associated with the purchase
request/order. The text in the Description field will be included in
the Comments field on the record.
Select
New | Associated Work Item |  Incident or select Add New Incident in the Associated Work Items field
to create a new Problem record that will be associated with the purchase
request/order. The text in the Description field will be included in
the Comments field on the record.
Incident or select Add New Incident in the Associated Work Items field
to create a new Problem record that will be associated with the purchase
request/order. The text in the Description field will be included in
the Comments field on the record.
Select
New | Associated Work Item |  Change or select Add New Change in the Associated Work Items
field to create a Change record that will be associated with
the purchase request/order. The text in the Description field will
be included in the Comments field on the record.
Change or select Add New Change in the Associated Work Items
field to create a Change record that will be associated with
the purchase request/order. The text in the Description field will
be included in the Comments field on the record.
To associate
an existing asset, click the Add Asset ![]() icon,
click the Add link on the Assets tab, or choose Purchase | Select Asset.
To create a new Asset record, select New | Asset. See Completing
Fields in the Asset Screen for more information. You'll need to associate
the asset after creating the record. If configured, notifications can
be sent to owners of the associated assets. If the asset has open incidents,
problems, or changes associated with it, “Yes” will appear along with
the number of open work items. Click the link to display a list of those
items.
icon,
click the Add link on the Assets tab, or choose Purchase | Select Asset.
To create a new Asset record, select New | Asset. See Completing
Fields in the Asset Screen for more information. You'll need to associate
the asset after creating the record. If configured, notifications can
be sent to owners of the associated assets. If the asset has open incidents,
problems, or changes associated with it, “Yes” will appear along with
the number of open work items. Click the link to display a list of those
items.
Service Catalog functionality enables customer requests of services, products, policies/procedures, etc. utilizing configured Change and Purchase templates. Requests can be made by support representatives via the Desktop and by customers via the mySupport portal. Note that access to an entire service catalog or individual service catalog entries may be restricted to specific customer and support representative groups.
Service catalogs are entered in the Configuration module; each contains a multi-level list of entries. Entries can contain an associated configuration item, cost, descriptive details, and access to custom fields. A root (top level) entry can also include a header and footer link that can display details. If a purchase template is associated with an entry, the line items from the template will appear as entries.
After a service catalog request is submitted by a customer, a Purchase Order or Change record will be created from the corresponding template and any configuration item specified for the service catalog entry will be associated with it. Custom fields may be completed by the customer or support representative.
Any associated cost configured for an entry will be included on the Change or Purchase Order record created from the entry. Select View | Service Hierarchy to display all of the selected entries in the service request submission; click on a number to open a record. See Viewing Records Created via Service Requests for more information.
Approval cycles require purchase requests to be approved by designated approvers before most functions can be performed. See Using Approval Cycles for more information.
If an approval cycle is in effect, an alert bar will appear at the top of the Purchase Request screen after a purchase request is saved and most of the fields will be disabled. (However, you can send correspondence and update work history.) An action drop-down field will appear in the approval alert bar if you are the current approver in the approval cycle or if you have permission to override approvals. See Specifying a Verdict for more information.
To initiate an approval cycle, select Purchase | Initiate Ad Hoc Approval after saving the record. A dialog will appear with the approval cycles designated as available for ad hoc use. The cycle will be enabled after the Initiate button is clicked.
Use the Approvals tab to view a graphic display of the approvers and status of each approval in the approval process. See Viewing Approval History for more information.