Setting Up Scheduled
Scans and Network Monitoring Setting Up Scheduled
Scans and Network Monitoring
Setting Up Scheduled
Scans and Network Monitoring Setting Up Scheduled
Scans and Network Monitoring
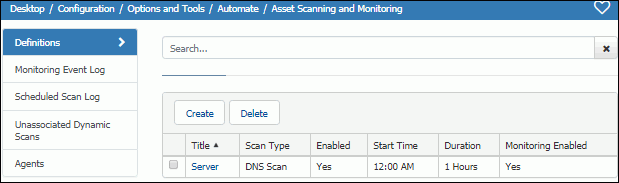
Asset scanning and monitoring can be scheduled and run automatically according to an Asset Scanning and Monitoring definition which defines the hosts (remote machines) to be scanned and/or monitored during a specified start and end time. You can specify a range of IP addresses, domain names, or an Active Directory path. Scheduled scans run on the server on which iSupport is installed.
These scans run on the server on which iSupport is installed, on the schedule of the Asset Scheduled Scan and Monitoring agent. Scheduled scans are viewed on the Desktop, and can be associated with Asset records. You can create asset records automatically for machines that are involved in scheduled scans but not associated with an existing record. Up to 15 of the most recent scheduled scans are retained for each machine associated with an asset record. From the Scan screen or Desktop, you can generate and save a side-by-side comparison of dynamic or scheduled scans.
The Monitoring feature enables the devices defined in an Asset Scanning and Monitoring Definition to be monitored for uptime, low disk space, and stopped services. To display monitoring results, you can create a view or use the Asset Monitor dashboard component on the Desktop. You could create a component for a range of devices to track such as buildings, IP ranges, routers, or servers. Details will appear when you hover over the device, drive, or service being monitored.
Enable the Asset Scheduled Scan and Monitoring agent on the Agents tab in the Asset Scanning and Monitoring list screen. This agent checks scheduled scan and monitoring definitions, initiates scans according to schedule, and enables monitoring. After this agent is enabled and saved, the Scan button will appear on the Basics tab in the Scan Definition screen for running the scan immediately.
You can use the following to view scan progress and errors:
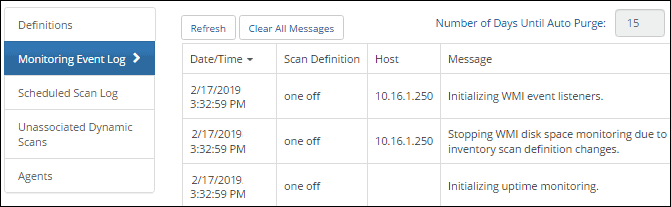
Use the Monitoring Event Log tab to display errors that occur while retrieving or saving the data, details regarding access to the machines included in the range to be monitored, and status information. You can use the iSupport Event Log and Microsoft® Windows7 Event Viewer to view application errors and log entries regarding the iSupport Agent Manager.
Use the Scheduled Scan Log tab to view messages regarding the progress of scans run using scheduled scan definitions. This includes errors that occur while retrieving or saving the data, details regarding the machines included in the range to be scanned and the machines that were unreachable, and status information. These messages are stored in the cAsset database and can accumulate quickly; it is important to use the Clear All Messages link in that screen to maintain the size of the stored data. Use the Number of Days Until Auto Purge field to specify a number of days after which messages will be deleted automatically by the Database Maintenance agent on the Global tab in the Administrative Tools | Agents screen.
Use the Scheduled Scans by Date view on the Desktop to display the most recent scan for each scanned device or create a custom view via the View and Report Designers on the Desktop.
The Unassociated Dynamic Scans tab in the Asset Scanning and Monitoring screen contains a list of dynamic scans that have been associated with an asset, but the asset’s asset type changed to non-scannable. To delete these scans, select the checkbox next to the scan and click the Delete link.