Overview of Asset Rule Functionality
Use the Asset tab in the Options and Tools | Automate | Rules screen to create rules that will perform actions when specified conditions based on Asset record fields or events are met.
Rule creation involves entering a name for the rule, selecting the type of rule, selecting one or more conditions and time frame intervals if applicable, and then selecting one or more actions to perform if those conditions are met.
In order for a rule to be evaluated, it must be included in a rule group; rule groups are applied to Asset records through asset types. (A default rule group will apply if none are applicable.)
A configured Hours of Operation definition of 24 hours a day/seven days a week or selected date and time ranges can be used for the effective time frame for a time-based rule and for an on-save rule with a condition that includes "Within Business Hours". The default Hours of Operation definition assigned to a rule group will apply if no definition is selected for one of its rules. If a definition is selected for both a rule and its rule group, the definition assigned to a rule will take precedence.
On Asset Save rules do not incorporate time frames; when an Asset record is saved, rules in the associated rule group are evaluated on the record, and if true, their actions are performed.
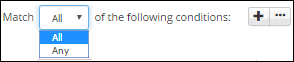
Use the first Match <All/Any> of the Following Conditions field to specify whether you want every configured condition in this rule to be met, or any configured condition in this rule to be met.
Use the Add Condition ![]() and
Remove Condition
and
Remove Condition ![]() icons to display and remove a set
of condition dropdown fields (a list of fields, a list of comparison methods,
and a list of values applicable to the selected field) to evaluate upon
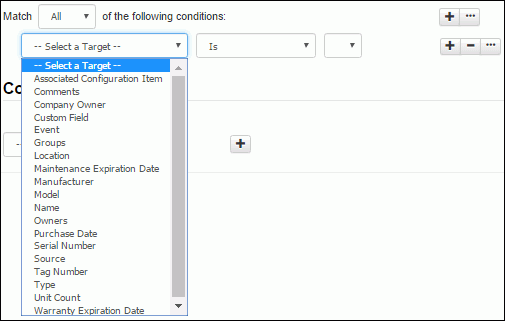
save of the record. In the Select
a Target dropdown, select what to evaluate: an asset
field or event, or whether it is within business hours.
icons to display and remove a set
of condition dropdown fields (a list of fields, a list of comparison methods,
and a list of values applicable to the selected field) to evaluate upon
save of the record. In the Select
a Target dropdown, select what to evaluate: an asset
field or event, or whether it is within business hours.
In the next dropdown, select the comparison method. Note that Contains returns a true result if the value is included in the field but other characters are included in a field as well; the value can be embedded in a word. "Is" returns a true result if the value is the only set of characters included in a field.
Finally, select the value to be used with the comparison method.
Click the Add Condition ![]() icon
if you wish to include another condition. You can use the Add Condition
Group
icon
if you wish to include another condition. You can use the Add Condition
Group ![]() icon to put a set of conditions to be evaluated together in a group.
icon to put a set of conditions to be evaluated together in a group.
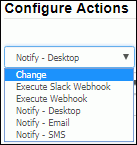
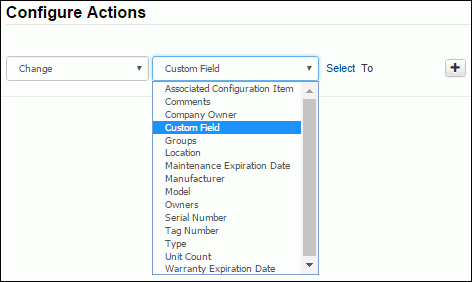
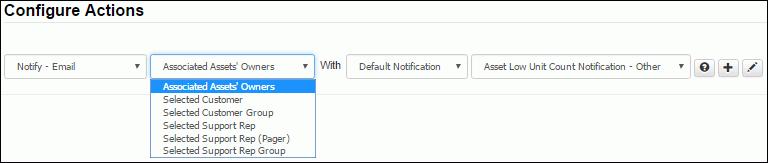
Use the Actions
section to select the actions to perform when the conditions are met.
After creating the first action you can use the Add Action ![]() icon to create another action. Use the Remove Action
icon to create another action. Use the Remove Action ![]() icon to remove any action lines.
icon to remove any action lines.
 icon
to display the contents of the selected notification. You can use
the Create New
icon
to display the contents of the selected notification. You can use
the Create New  and View/Edit
  icons to access the Custom
Notification screen.
icons to access the Custom
Notification screen.
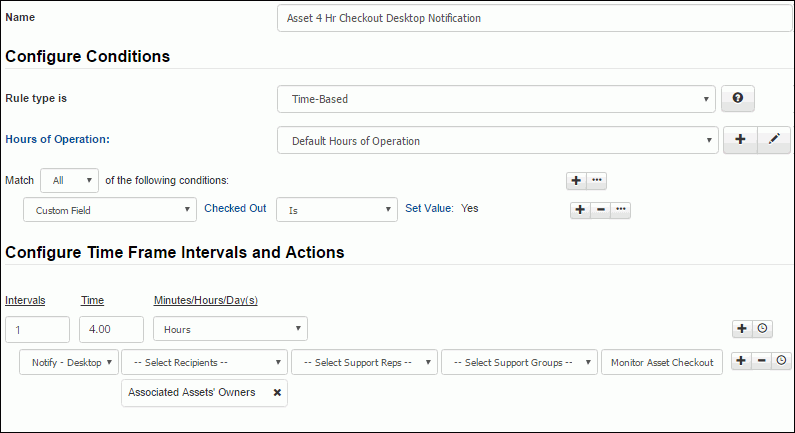
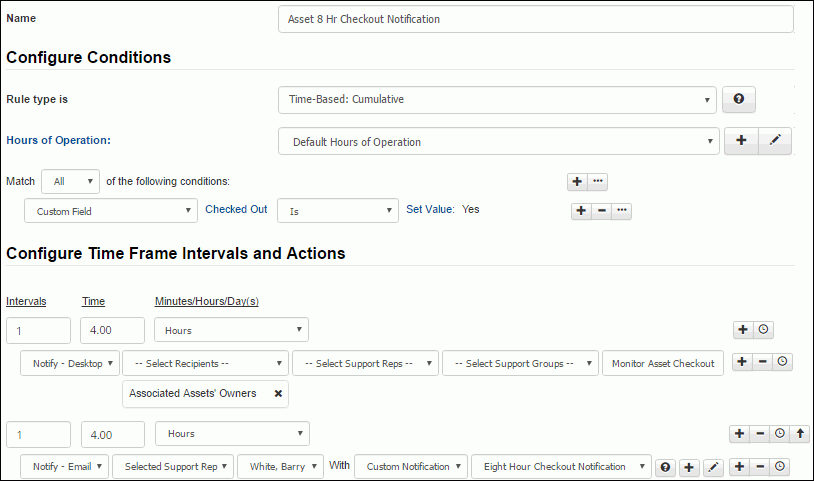
With Time-Based and Time-Based: Cumulative rules, the Time Frame Interval Settings section will include Intervals, Time, Minutes/Hours/Day(s) fields as well as a set of fields for entering an action to be performed when the condition is met for the interval time frame.
The difference between these rules is that, if conditions change prior to the configured interval settings, Time-Based rules will clear all pending actions and the time frame will restart if conditions are met again; Time-Based: Cumulative rules will suspend all pending actions and if conditions are met again the time frame will include previous amounts of time in which conditions were met.
In the Configure Time Frame Intervals and Actions section, use the Intervals field to specify the number of times a time frame should be established and monitored, and use the Time and Minutes/Hours/Day(s) fields to specify the amount and unit of time (in minutes, hours, or days) in the time frame. Note that the Day(s) option is calculated with one day equal to 24 business hours. Use the dropdowns in the indented actions line to specify the actions to perform if conditions are met for that interval time frame. Example
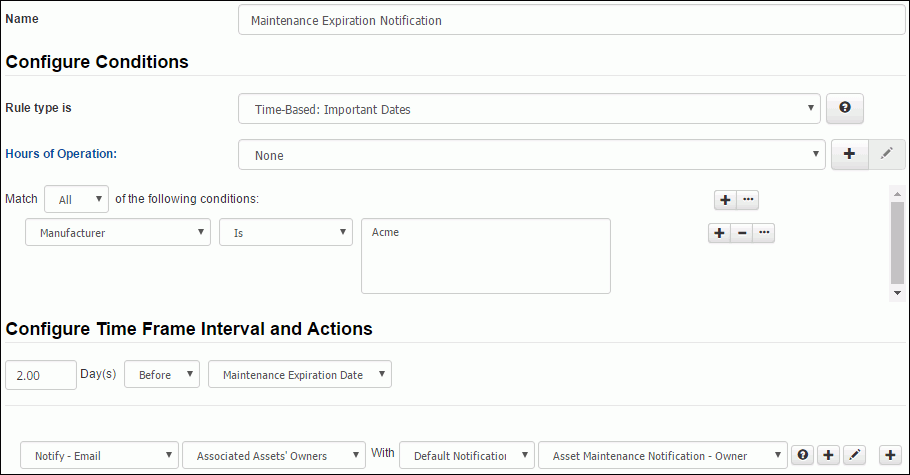
If a date or date/time custom field is created for assets or the Maintenance or Warranty feature is enabled in Feature Basics, Time-Based: Important Date rules enable you to specify a number of days before or after the value in a specified date field. This type of rule will be evaluated when the defined number of days before or after the value in the specified date field occurs. Actions will be performed if the rule's conditions are met at the time the Time-Based Rule agent runs.
You can use the Add Interval  icon to add another interval time frame set and actions to perform if
conditions are met for that interval time frame. Example
icon to add another interval time frame set and actions to perform if
conditions are met for that interval time frame. Example
The Move Down  and Move Up
  icons
will appear for changing the order in which the interval time frames will
be evaluated.
icons
will appear for changing the order in which the interval time frames will
be evaluated.
Note: If you change a condition, time interval, or time value in an existing time-based rule and interval timers are in process for any records associated with it, the timers will be reset.
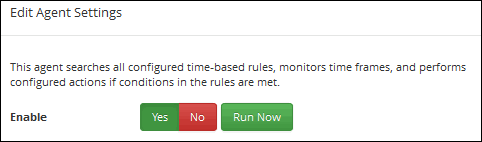
If you are configuring Time-Based and Time-Based: Cumulative rules, ensure that the Time-Based Rules agent is enabled via the button in the Rules list screen. Note: If you change a condition, time interval, or time value in an existing time-based rule and interval timers are in process for any records associated with it, the timers will be reset.
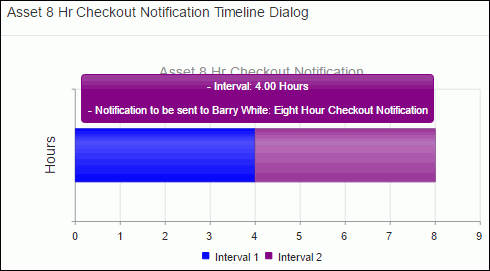
Use the View Timeline button at the bottom of the screen to display a dialog with a gauge chart depicting the time frames for each interval; actions will appear when you hover over a time frame with your mouse.
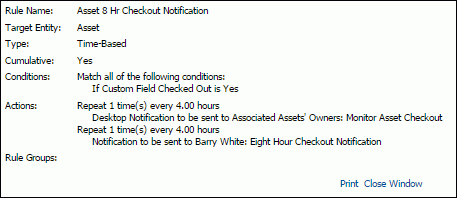
Click the Print button to display a summary of your entries; you can click the Print link in the dialog to send the information to the printer.
After creating a rule, you’ll need to include it in a rule group. You can do this via the Rule Group tab in the Rules screen, or via the Rule Group screen. On the Rule Groups tab, click the Add link. Rule groups configured via the Rule Group screen appear; select the applicable groups and click OK. The rule group displays along with the Position field; use it to specify the order in which actions should be taken when conditions are met. If rules in a group contain duplicate actions, the position will determine the rule that will take precedence.