You can create links for customers to submit an incident, change, or purchase request. The fields and tabs included on the Submit screen are configurable, as well as the default mySupport-submitted record assignee and the text to display after submission. Authentication (logging in) is required in order to submit and view incidents, changes, and purchase requests.
Custom fields can be individually enabled or disabled for display on a mySupport portal. If a call script is enabled for a category set, it will not display on a mySupport portal. When a customer saves an incident or change, any rule group associated with the lowest level of category will be applied. If none is associated, the next (higher) category level is searched, and so on. Rule groups for customers, companies, or category sets are applied to mySupport-submitted incidents; the default rule group will only be applied if none of the provided category levels, the customer, or the company are associated with a rule group. However, if a rule group is associated with a template, the template rule group will override any rule groups assigned to the category, customer, or company.
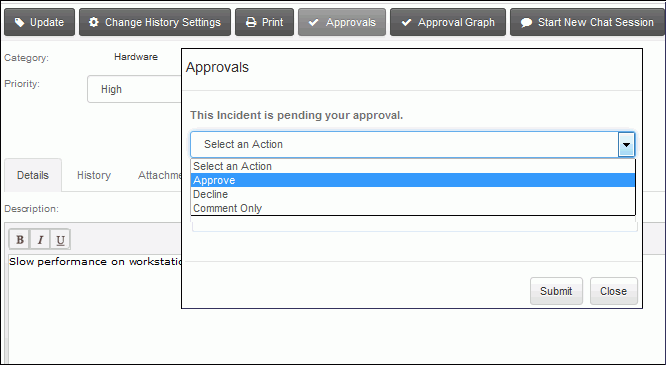
If configured, an Update button will appear after an incident or change has been submitted; a customer can use it to enter text that will be included in the work history. Customers can select the history types to display via the Change History Settings button on the toolbar. The Approvals button will appear if the approval button is configured in the mySupport Options screen and a customer’s work item is pending approval or a customer is the current approver due to specify a verdict. Verdict options are Approve, Decline, or Comment Only. A customer can cancel approvals if the customer is assigned to the work item. The Approval Graph button displays approvers in the cycle.

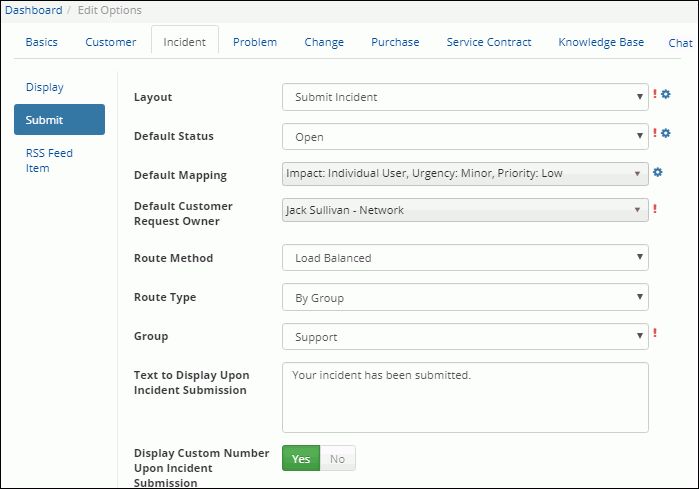
Use the Submit settings in the Options screen to specify the layout of work item submit screens and defaults for work items submitted by customers from a mySupport portal and configure defaults for the status, priority, assignee, load balanced route method, and text to appear after submission.

Layout |
Select the layout
containing the fields and tabs that will appear when customers
submit a work item of the applicable type via the mySupport portal
or click the Configure Note that you can enable the Category Select dialog to display when the Incident or Change Submit screen initially appears on a mySupport portal; see the Configuring Field Labels section in Configuring Screen Layouts. You can enable the category picker for a template and require that the user select the lowest level category via the Lock Category setting in the Template and Hierarchy Template configuration screens; see Creating Auto-Fill and Auto-Close Incident Templates and Creating Incident Hierarchy Templates. |
Default Status |
If
the Status field is included for the Submit screen, select the
status to populate that field by default; if the Status field
is not included, select the status to assign by default. Click
the Configure |
Default Mapping |
This
field appears if impact and urgency mapping is enabled; click
this link to select the Impact, Urgency, and Priority to display
by default in the Impact, Urgency, and Priority fields in the
Incident screen. Click the Configure |
Default Priority |
This field appears if impact and urgency mapping is not enabled; select the priority (Low, Medium, High, or Emergency) to assign to newly-created work items. |
Default Customer Request Owner |
Select the support representative to assign to incidents submitted by customers from the mySupport portal. If a load balanced routing method is specified as well, incidents will be assigned to this support representative if none are available. |
Routing Method |
Select the method by which work items are assigned: none, load balanced, or round robin. Select None to only assign mySupport-submitted work items to the support representative specified in the Default Customer Request Owner field. If there is no support representative available, the work item will be assigned to the support representative specified in Default Customer Request Owner field. See Selecting an Assignee for more information on routing. If routing by group or location, select:
|
Text to Display Upon <work item type> Submission |
Enter the message to display after a customer submits a work item from the mySupport portal. |
Display Custom Number Upon <work item type> Submission |
Select Yes to display the configured custom number label and number instead of iSupport’s ten-digit alphanumeric number in the dialog that appears when a customers submits a work item via a mySupport portal. For example, if the custom number label is "Case #", that label and the configured number would appear in this example. |
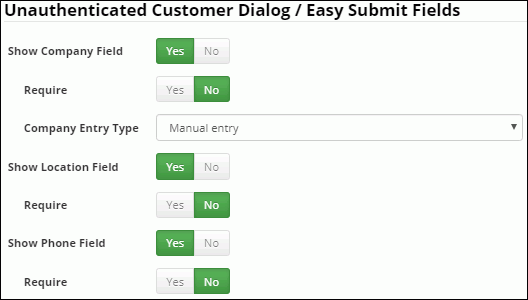
Use the fields in the lower half of the screen to configure the dialog that displays when authentication is not required and a customer submits an incident or change or uses the Easy Submit interface.

Unauthenticated Customer Fields (Incident and Change only)/Easy Submit Fields (Incident Only) |
Select Yes in the Show Company Field, Show Location Field, and Show Phone Field options to include those fields in the Customer Information Required dialog that displays when authentication is not required and a customer submits an incident or change or uses the Easy Submit interface which enables customers to use an older version of a device that cannot render HTML5 to submit incidents. The Require field will appear if you enable the Show Company Field, Show Location Field, or Show Phone Field settings; select Yes to require the customer to make an entry in the enabled field. An explanation point will appear to the right of the field. The Company Entry Type field will also appear if the Show Company Field setting is enabled; select:
|