Use the Chat tab in the Core Settings | mySupport | Portals Options screen to configure the Chat Now button and/or dialog for the customer side of the chat on the mySupport portal. Note that you can enable iSupport’s mySupport Chat feature to be hosted on other web sites.
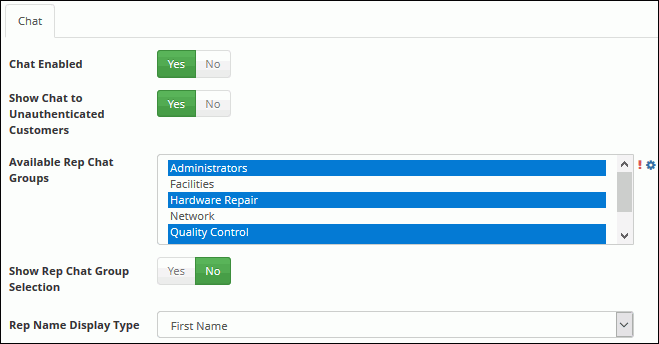
The upper portion of the Chat tab in the Options screen contains settings for enabling chat for customers that are not authenticated and designating the support representative groups (enabled in the Support Representative Group screen) to which chat requests will display.
Chat Enabled |
Select Yes to display the fields for configuring chat options. |
Show Chat to Unauthenticated Customers |
Select Yes to display the chat button and/or flyout dialog to customers that are not logged in to the mySupport portal. |
Available to Rep Chat Groups |
The groups designated as available (via the Available for Customer Chat field in the Support Representative Group screen) appear; select the group(s) to which chat requests will display. If multiple groups are selected, the customer does not select a group (if No is selected in the Show Rep Chat Group Selection field below), and the support representative who accepts the chat is available in multiple groups, a list of those groups will appear for selection. |
Show Rep Chat Group Selection |
If more than one group is selected in the Available Rep Chat Groups field, select Yes to display the group dropdown field. |
Rep Name Display Type |
Select how to display the names of support representatives: by first name or by full name. |
Use these fields on the Chat tab to set options for the appearance of the Chat Now button and dialog.
Chat Button Position |
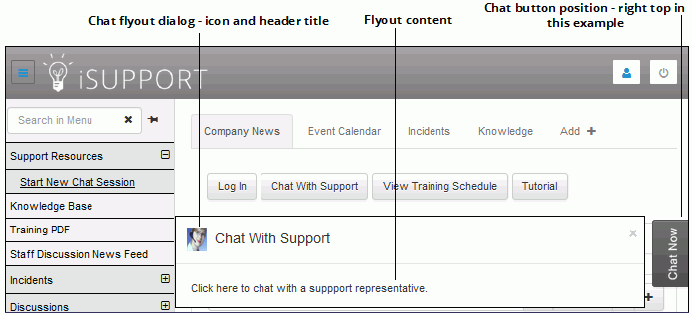
Select the position on the mySupport portal screen on which the Chat button should be anchored; you can display it on the top, middle, and bottom of the left or right sides, as well as the left, middle, and right sides of the bottom of the screen. |
Enable Chat Flyout |
Select Yes to display a dialog on the mySupport portal for the customer to click to initiate a chat. Use the Chat Flyout Delay field to enter the number of seconds to lapse before the dialog appears on the mySupport portal. Use the Header Title field to enter text for the top of the dialog, the Icon field to select an image to display next to the title, and the Flyout Content field to enter text to appear in the dialog. |

Use these fields on the Chat tab to set options for what will happen when a support representative does not answer a chat.
Timeout Length |
Enter the number of seconds in which the chat dialog should appear on the mySupport portal before displaying the timeout message. Note that this does not affect the chat dialog for support representatives using the Desktop. |
Timeout Message |
Enter the text to appear in the chat dialog after the timeout length has been reached. |
Display Countdown to Rep |
Select Yes to include the amount of time before the chat times out; it will be the number of seconds in the Timeout Length field, up to a maximum of 60 seconds. |
Include Create Incident Button/Incident Template |
Select Yes to include a Create Incident button under the timeout message and Try Again text in the chat dialog. An incident with the selected incident template will be automatically created when the customer clicks the button. Note that the setting in the Append Description/Resolution to Existing Text field for the template will determine whether the chat request text will be included in the incident’s Description field. |
If you wish to enable a Chat with Support Rep button on the mySupport incident display screen, select Yes in the Show New Chat Button field in the Incident/Display portion of the Options screen.