Using the Service Contract Screen Using the Service Contract Screen
![]() Using
the iSupport Service Contract Screen
Using
the iSupport Service Contract Screen
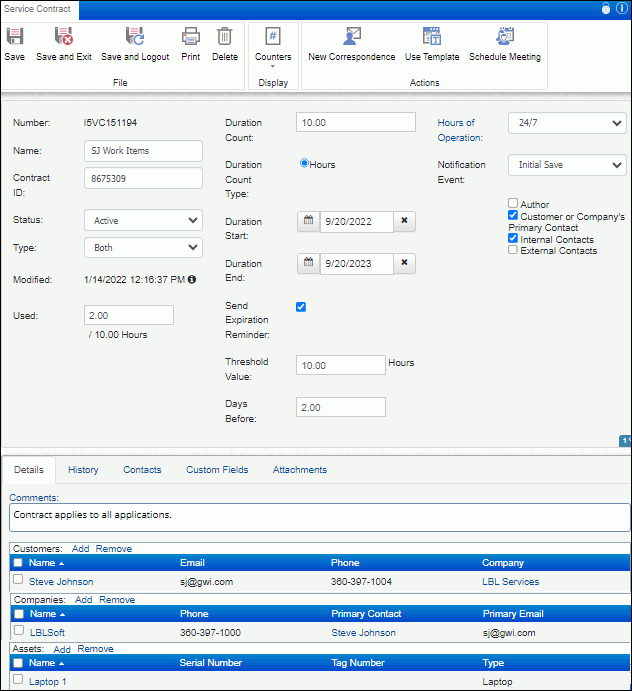
Use Service Contract functionality to track and restrict incidents and changes for customers, companies, and/or assets. In the Service Contract Screen you can set up contracts based on work item count (a specified number of incidents and/or changes), hourly count (a specified number of hours), duration (timeframe in days), or a combination (limiting the number of incidents and/or changes within a specified daily timeframe). You can assign a service contract to one or more customers, companies, or assets.
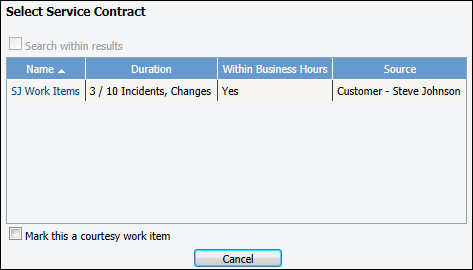
If a valid service contract is associated with the customer, customer’s company, and/or any assets owned by the customer in the Incident and Change screens, a prompt will appear for selecting the contract to which the incident or change should be applied.
You can access the Service Contract entry screen by clicking the Service Contract option on the Desktop menu or by clicking the New link in the Service Contracts section in the Customer Profile, Company, and Asset screens.
The name, comment, and hours of operation are required in order for a Service Contract record to be saved.
A unique number is assigned to each Service Contract record; if configured, a custom number field will appear above the Number field. You may be required to make an entry in this field, and this field may be read-only after you enter the number and save the record.
In the Name field, enter a name that will display for selection in the Incident or Change screen.
In the Contract ID field, enter an identifier for the contract; your entry can include letters, numbers, and symbols.
A default status appears in the Status field as configured; change it if applicable. Custom status labels may be configured for the following basic status levels:
Active - the contract is available for use with incidents and changes.
Inactive - the contract is not available for use with incidents and changes.
Suspended - the contract is for use with incidents and changes.
Expired - Select to make the contract settings read-only. A service contract can be assigned this status automatically via the Service Contract agent; it checks all service contracts for total counts and/or end dates/times and if the specified total count and/or end date/time is reached, the agent changes the status to an Expired status.
Different fields will appear depending on the basis you select in the Type field.
To base the contract on a specified timeframe (in days), select Duration. Then enter the beginning and end dates in the timeframe in which incidents and/or changes are counted against the contract in the Duration Start and Duration End fields.
To base the contract on a specified number of hours or work items (incidents and/or changes), select Count and then:
Enter the maximum number of hours or incidents and changes allowed under the contract in the Duration Count field. (Note that hours or incidents and/or changes are counted against a contract when the record is initially saved.)
In the Duration Count Type field, select Hours to base the contract on the number of hours entered for time worked on incidents and changes or Work Items to base the contract on the number of incidents and changes created for the associated customer, asset, or company. If the number of incidents/changes and/or hours that should be counted against the contract changes, enter a different number in the Used field.
To base the contract on a specified number of incidents and/or changes within a specified daily timeframe, select Both and then:
Enter the maximum number of hours or incidents and changes allowed under the contract in the Duration Count field. (Note that hours or incidents and/or changes are counted against a contract when the record is initially saved.)
In the Duration Count Type field, select Hours to base the contract on the number of hours entered for time worked on incidents and changes or Work Items to base the contract on the number of incidents and changes created for the associated customer, asset, or company.
Enter the beginning and end dates in the timeframe in which incidents and/or changes are counted against the contract in the Duration Start and Duration End fields. If the number of incidents/changes and/or hours that should be counted against the contract changes, enter a different number in the Used field.
In the Comments field, enter any comments or extra information regarding the contract.
Sending Notifications
Select the Send Expiration Reminder checkbox to enable an Expiration Reminder notification to be sent when the contract is about to expire. The notification will be sent according to the value specified in the applicable Threshold Value or Days Before field. In the Threshold Value field, enter the number of incidents and/or changes to be reached before triggering the Expiration Reminder notification to be sent. In the Days Before field, enter the number of days before the Duration End date in which to trigger the Expiration Reminder notification to be sent.
In the Notification Event field, select one or more of the following service contract events that will trigger a notification, and then select the recipient for those notifications.
Initial Save - a service contract is initially saved
Duration Change - an entry is made in the Duration fields for a service contract
Contract Decremented - an incident or change is counted against a service contract
Status Change - an entry is made in the Status field for a service contract
Expiration Reminder - the contract is about to expire
Selecting Customers, Companies, and Assets
Use the Add link to assign the contract to customers, companies, and/or assets. When one of these is selected for an incident and/or change and the contract is within the specified duration and hours of operation, the contract count will be decremented. Note that service contracts can also be assigned via the Customer Profile, Company, and Asset entry screens.
Select the Hours of Operation definition that has the time frames in which the contract should be in effect; incidents and/or changes will be counted against the contract during the these time frames.. You can select the Default Hours of Operation (Monday-Friday, 8am-5pm) or a definition created via the Hours of Operation tab in Global Settings. Click the Hours of Operation link to display details on the selected definition.
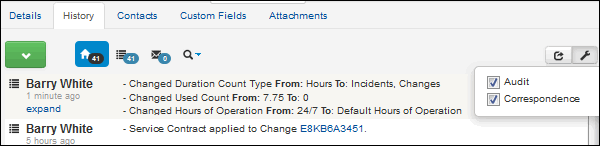
Use the History tab to view notations on all service contract actions. To view a notation of every action performed on the service contract including the date, time, and author stamp, select the Audit checkbox. Use the Correspondence checkbox to display entries of sent and received correspondence, including the subject line and body of the correspondence.
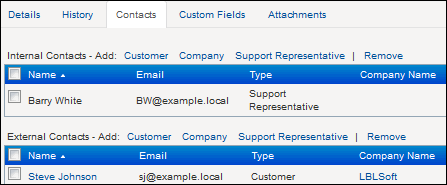
On the Contacts tab, select the customers, companies, and/or support representatives that can be designated as recipients for the Initial Save, Duration Change, Contract Decremented, Status Change, and Expiration Reminder notifications enabled in the Notification Event field on the Details tab.
The fields on the Custom tab are used to enter information specific to your company. The name of the tab is specified during configuration; see Completing Custom Fields for more information.
To attach a file to the service contract, click the Add button in the Attachments field and select the file. You can select the Show Correspondence Attachments checkbox to display attachments from all sent or received correspondence (including attachments from an inbound email update) associated with the contract. A Copy button will be included next to correspondence attachments; you can use it to directly associate the attachment to the contract.
If configured, a New Meeting  icon may appear in the Service Contract screen for scheduling
a Microsoft® Office Outlook® calendar and/or Google Calendar meeting.
You can view the schedules of meeting attendees, create a meeting, and
configure a notification to be sent to the meeting attendees.
icon may appear in the Service Contract screen for scheduling
a Microsoft® Office Outlook® calendar and/or Google Calendar meeting.
You can view the schedules of meeting attendees, create a meeting, and
configure a notification to be sent to the meeting attendees.
If configured, the Awareness
feature displays a Connected Reps  icon and alert if
two or more support representatives have the same record open. You can
click the icon to display the support representative(s) viewing the work
item and initiate a chat by clicking on their name.
icon and alert if
two or more support representatives have the same record open. You can
click the icon to display the support representative(s) viewing the work
item and initiate a chat by clicking on their name.
To attach a file to the Service Contract record, click on the Add File button on the Attachments tab and select the file. The file name appears in the Attachment field.
Use templates for service contracts that are entered frequently. If
configured, defaults may populate fields in the Service Contract screen.
Click the Use Template  icon to
display a list of configured templates.
icon to
display a list of configured templates.