Configuring Google Integration Configuring Google Integration
Use the Options and Tools | Integration | Google Integration screen to configure the following.
Set up Google Calendar integration to enable users to access their
Google Calendar for the Calendar option on the Desktop and mySupport portals,
a New Meeting ![]() icon in work
item screens for scheduling a Google Calendar meeting, and a Google Meet
icon in work
item screens for scheduling a Google Calendar meeting, and a Google Meet
![]() icon to appear in work item
screens for starting a meeting.
icon to appear in work item
screens for starting a meeting.
With Google Calendar, support representatives can view the schedules of meeting attendees, create a meeting to be added to their calendar, and configure a notification to be sent to the meeting attendees; see Accessing Microsoft Outlook and/or Google Calendar for more information.
When the Google Meet icon is selected, the Generate Join URL dialog will appear for you to enter the topic, share the Join URL, and email a link to the meeting. The Share Join URL option will display a dialog with the URL and an option to start the meeting; the Email Link option will display the Correspondence dialog.
The timeframe (work hours) during which support representatives are available to be scheduled via iSupport can be set via the Desktop or Support Representative Profile screen. On the Desktop, a support representative can view their calendar via the Calendar component and work item-specific calendars can be viewed from action menu. Administrators can view support representative calendars via the Support Representative Profile screen.
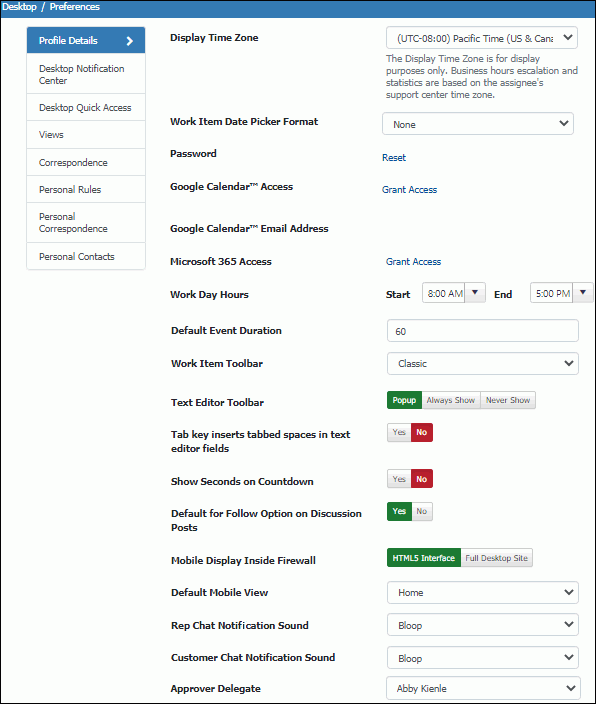
Support representatives will need to use the Google Calendar Email Address and Google Calendar Access fields on the Details tab in the Preferences screen to enable access to their calendar(s) and set the work day hours during which they are available to be scheduled via iSupport. (The dates/times outside of work day hours are designated as "Unavailable" in the calendars displayed via iSupport.) After clicking the Grant Access link, a Google dialog will appear for the support representative to allow iSupport access to their calendar and a code will be provided. The Grant Access to Your Google Calendar dialog will appear in the Preferences screen with an Auth Code field for pasting the code. After clicking Continue, “Access Granted” will appear in the Google Calendar Access field.
Google Calendar integration requires a Client ID and Client Secret from a Google API Project. Follow the steps on the screen to configure a Google API Project, and copy the Client ID and Client Secret from the project into the applicable fields on the Google Calendar tab.
On the Google Calendar tab, follow the steps on the screen and copy the Google API Client ID and Secret into the applicable fields. Enter the subject body of the email to be sent for the scheduled meeting; use the Include Field link to add field values regarding the meeting.
Google Meet meetings can be included in work item screens; add the Google Meetings field to a work item screen layout via the Layouts configuration screen.
Note: Support representatives will need to use the Google Calendar Email Address and Google Calendar Access fields on the Details screen in the Preferences dialog to enable access to their calendar(s) and set the work day hours during which they are available to be scheduled via iSupport. After clicking the Grant Access link, a Google dialog will appear for the support representative to allow iSupport access to their calendar and a code will be provided. The Grant Access to Your Google Calendar dialog will appear in the Preferences screen with an Auth Code field for pasting the code. After clicking Continue, “Access Granted” will appear in the Google Calendar Access field.
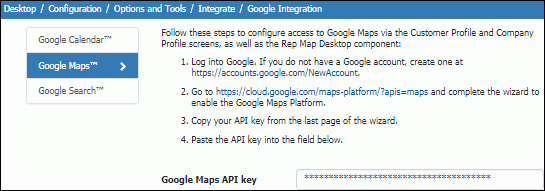
Enable Google Maps integration for access to Google Maps via the Customer Profile and Company Profile screens, as well as the Rep Map Desktop component. Follow the steps on the screen and enter the Google Maps API key.
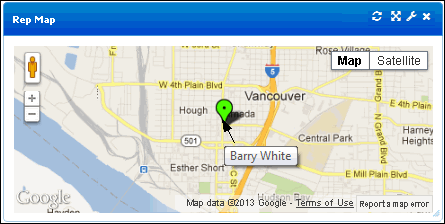
Maps will appear as shown in this example.
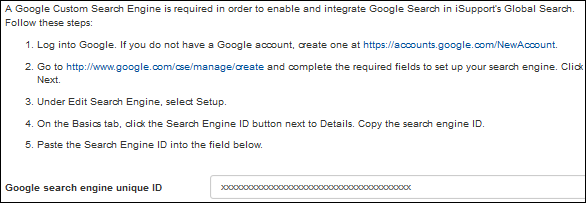
Enable Google Search integration to configure Google Search for the Global Search component on the Desktop. Follow the steps on the screen to create a Google Custom Search Engine, copy the unique ID from the Google Custom Search Engine screen, and enter it in the Google Search Engine Unique ID field.
The Google Search tab will appear in the Global Search component as shown in this example.
Note: iSupport utilizes or integrates with a number of third party applications and resources; changes in these external applications and resources may have a negative impact on functionality in iSupport. Depending on the nature and degree of the change, iSupport will, at its discretion, revise the current version of iSupport or make a corrective change in a future release of iSupport.