![]() Adding
Customers to Groups via the Customer Profile Screen
Adding
Customers to Groups via the Customer Profile Screen
![]() Adding
Customers to Groups via the Company Screen
Adding
Customers to Groups via the Company Screen
Customer groups enable you to target a selected set of customers for work item layouts, correspondence, surveys, reports, mySupport functionality, and more.
When you create a customer group, you can quickly assign all of a company's current customers to the group. You can also assign customers to a group via the Customer Profile screen, Company screen, and Desktop. Customer Groups Tab Example
To create a customer group, select Core Settings| Groups | Customer and click the Create link. On the Details tab, enter the group name and description, and in the Location field, select the support representative location to associate with the customer group for location-based routing of incidents submitted via the mySupport portal.
In the Incident Layout field, select the layout containing the fields
and tabs that will display when a customer in the group is selected in
the Incident screen. You can use the New  and
View/Edit
and
View/Edit  icons to access the
Layouts
configuration screen. Layouts can also be associated with a category,
support rep group, incident template, or hierarchy template; the Order
of Precedence field in the Options and Tools | Customize | Incident Layouts
screen determines which layout to use when more than one reference is
applicable (for example, if the logged in rep's primary group has a layout
as does the selected category). For categories, the layout found with
the lowest level will be used; if a layout is not found at the lowest
level the next level up will be checked, and so on up to the top level.
If no layout is associated at the top level, the default layout specified
in the Layouts screen will be used.
icons to access the
Layouts
configuration screen. Layouts can also be associated with a category,
support rep group, incident template, or hierarchy template; the Order
of Precedence field in the Options and Tools | Customize | Incident Layouts
screen determines which layout to use when more than one reference is
applicable (for example, if the logged in rep's primary group has a layout
as does the selected category). For categories, the layout found with
the lowest level will be used; if a layout is not found at the lowest
level the next level up will be checked, and so on up to the top level.
If no layout is associated at the top level, the default layout specified
in the Layouts screen will be used.
Use the Membership tab to assign selected customers to the group or to associate the group with a company for future customer assignment.
To add a customer to the group, click the Customers radio button and then click the Add link. Select an existing customer or create a new one.
To add all current customers of a company to the group or associate the group with a company for future customer assignment, click the Companies radio button. Once you select an existing company or create a new one, following dialog appears:

If you select OK at this prompt, all of the company’s current customers will become members of the group. The company will be associated with the group for future customer assignment.
If you select Cancel at this prompt, none of its current customers will be assigned to the group. However, the company will still be associated with the group for future customer assignment.
mySupport options include configuration settings for the structure and content of the mySupport portal interface (except navigator detail). Options can be assigned to customers, companies, and groups; the order of precedence is determined by a setting in the mySupport Portal Configuration screen. The system will check the Default for mySupport URL in Notifications field in the customer’s profile, customer’s primary company profile, and primary group profile. If a URL is specified in any of those fields, it will be used. If none exists in any of those fields, the mySupport portal URL in the Default for mySupport portal URL in Notifications checkbox selected will be used. On the Associated mySupport Options tab in the Core Settings | Groups | Customer screen, select the mySupport portal URLs and mySupport options to assign to members of the group.
Mobile mySupport options include configuration settings for the structure and content of the mySupport portal interface, and mobile mySupport portal options can be assigned to customers, companies, and groups; the order of precedence is determined by a setting in configuration. Any assigned options will be used; if none are assigned or if a customer does not log in, the mobile mySupport portal options specified as default in configuration will be used.
On the Associated Mobile mySupport Options tab, select the mySupport portal URLs and mySupport Options to assign to members of the group.
Use the Views, Charts, Calendars, Discussion Feeds, and mySupport Feeds, tabs to display the items that can be accessed by members of the customer group on mySupport portals.
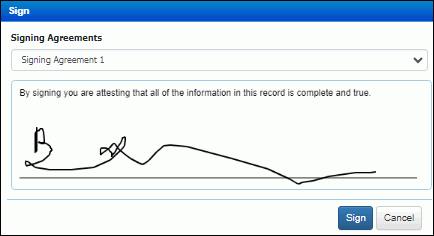
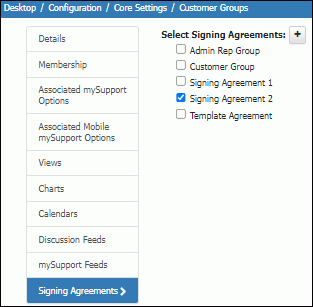
Use a signing agreement to display details in the Sign dialog in the Incident and Change work item screens. Signing agreements can be associated with customer and support representative groups, categories, and incident and change templates. If an incident or change involves more than one associated signing agreement (group, category, or template), all will be included in the Sign dialog in a dropdown for selection. (Note that “Blank” is also included for displaying no text above the signing line.)
On the Signing Agreements tab, select the agreements to appear for selection in the dropdown when the incident or change involves the associated customer group. Use the plus sign icon to create an agreement via the Signing Agreements configuration screen.