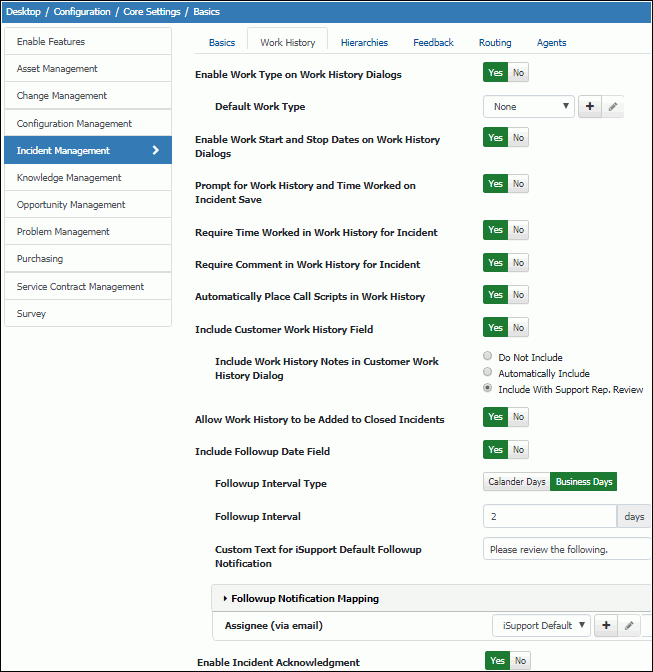
Use the Incident Management | Work History tab in the Feature Basics screen to configure options for the Incident Acknowledgment feature and the Work History and Followup Date fields in the Incident screen.
Enable Work Type on Work History Dialogs |
Select Yes to include a Work Type field in the Work History dialog in the Incident screen. |
Default Work Type |
If the Work Type
field is enabled, select the work type to appear by default in
that field. Use the Create New |
Enable Work Start and Stop Dates on Work History Dialogs |
Select Yes to include Work Start and Work Stop fields in the Work History and Incident Save dialogs in the Incident screen. The Work Start field defaults to the date and time the support representative loaded the work item. The Work Stop field defaults to the current time, but there will be at least a one minute gap between the Start and Stop times. For example, if a new incident is opened at 1:00 PM, the support representative works with the customer for 30 minutes, and then clicks the Add Work history option or saves and displays the Save dialog, the Work Start would be set to 1:00 PM and the Work Stop would be set to 1:30 PM. This Time Worked field would show the 30 minutes of time worked reflected by the gap. Support representatives can type directly in the Work Start
and Work Stop fields or use the calendar |
Prompt for Work History and Time Worked Prompt on Incident Save |
Select Yes to display the Save dialog every time a support representative saves an incident. |
Require Time Worked in Work History for Incident |
Select Yes to require an entry in the Work History dialog Time Worked field in the Incident screen. |
Require Comment in Work History for Incident |
Select Yes to require an entry in the Work History Comment field in the Incident Save dialog before the record can be saved in the Incident screen. |
Automatically Place Call Scripts in Work History |
Select Yes to, when a call script is used, automatically include the entire call script in the Work History field. This will also make the call script editable when it appears. Call scripts are entered and associated with categories in the Category entry screen. If you select No in this field, the call script will not be editable. |
Include Customer Work History Field |
Select Yes to include a field on the Incident screen that includes work history notes for display when customers view their incidents on the mySupport portal. Depending on the options selected in the Include Work History Notes in Customer Work History Dialog field, the field can include the contents of the Work History field (either with or without review by the support representative). |
Allow Work History to be Added to Closed Incidents |
Select Yes to enable support representatives to update the Work History field in incidents with a Closed status. |
Include Work History Notes in Customer Work History Dialog |
This field appears if including the Customer Work History field. Select:
|
Include Followup Date Field |
Select Yes to include a Followup Date field in the Incident screen for a followup reminder email to be sent to the assignee of an incident. After completing this and the followup date configuration fields, enable the Followup agent. |
Followup Interval Type |
If including a followup date on the Incident screen, select the basis for the default followup date interval: calendar days (which include weekends) or business days (which excludes weekends). |
Followup Interval |
If including a followup date on the Incident screen, enter the number of days (after the incident open date) to be used in the calculation of the date to display by default in the Followup field. When the followup date is reached, a followup reminder email will be sent to the assignee of the incident. Once the email is sent, the date is recalculated based on the number of days entered in this field. |
Custom Text for iSupport Default Followup Notification |
If including a followup date on the Details tab in the Incident screen, a reminder email will be sent to the support representative on the followup day. Enter text to be included as the first line in the body of the default email text. (Note that this text will not be included in any custom notifications.) The email will also contain a document link and the caller’s name and company; this information will still be included if this field is left blank. |
Recipient and Notification Mappings |
Select the notification to be sent to the assignee of the incident with a current followup date. You can select the default notification or a predefined custom notification; select Create New Custom Notification to access the Custom Notifications screen to create one. |
Enable Incident Acknowledgement |
Select Yes to display an alert bar for new assignees to acknowledge incidents that have been:
When the assignee opens the ticket, an alert bar will appear at the top of the screen that states: "This incident was routed to you. Click to acknowledge that you have received this ticket." When the support representative clicks the Acknowledge button, an entry will be recorded in the Audit History. You can enable Incident Acknowledgement notification to be sent when a ticket is acknowledged. |