 Configuring Email Account Details and Inbound Settings Configuring Email Account Details and Inbound Settings
 Configuring
Default Outbound Email Settings
Configuring
Default Outbound Email Settings
Use the Account Details tab to set up an incoming email account and define the incoming email server, protocol, and access information.
Name |
Enter a name for the inbound email account. |
Account is Set to Active |
Select Yes to enable the account to process incoming email according to the schedule of the Email Processing agent. |
Email Server Access Protocol |
Select the type of access protocol used by your mail server: POP3 (Post Office Protocol), IMAP4 (Internet Message Access Protocol), Gmail, or EWS (Exchange Web Services). |
POP3 or IMAP4 |
|
Use SSL Connection |
This field appears if using POP3 or IMAP4. SSL is an encryption method that overlays the connection between the iSupport server and the mail server. Select Yes if SSL encryption is enabled on the incoming mail server. The default port number in the Incoming Mail Server Port Number field will change because SSL uses a different default port; verify that the assigned port is correct and change if necessary. |
Email Account User Name |
Enter the name to be used by the Email Processing agent to log in to the server containing the email. Note: The inbound email account for processing email must be isolated and not viewed. Any email that has been read or set back to unread will be skipped during the conversion process. If permitted by the email application, mark the inbound email account used for processing email as text only. |
Incoming Email Server Port Number |
This field appears if using POP3 or IMAP4. Enter the port number used to access the server containing the email. (For POP3, this number is typically 110. For Secure POP3 (SSL-POP), this number is typically port 995. For IMAP4, this number is typically 143.) |
Incoming Email Server Connection Timeout |
This field appears if using POP3 or IMAP4. Enter the number of minutes for iSupport to wait for a response from the incoming mail server when connecting, requesting or deleting email, or disconnecting. |
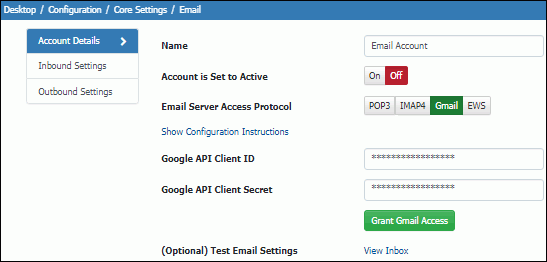
Gmail |
Select this option to use Gmail account credentials to access the email server. Enter the Google API Client ID and Google API Client Secret from your Google Gmail API Project and select Grant Gmail Access. Example Click the Show Configuration Instructions link for more information. |
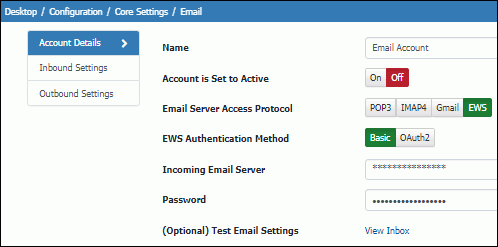
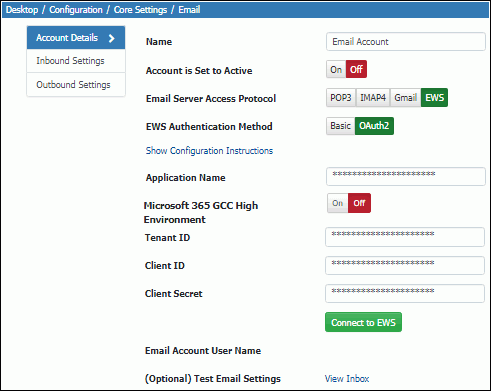
EWS (Office 365 Exchange Web Services) |
|
EWS Authentication Method |
|
Basic |
Select this option to utilize Microsoft Exchange's HTTP basic access method for accessing the EWS server via a server name/IP, exchange account user name, and password. Example |
Incoming Email Server |
Enter the name or IP of the Microsoft Exchange server to be used for outbound notifications sent by iSupport. |
Exchange User Account Name/Password |
Enter the user name and password for iSupport to use for connecting to the Exchange server. Note: The inbound email account for processing email must be isolated and not viewed. Any email that has been read or set back to unread will be skipped during the conversion process. If permitted by the email application, mark the inbound email account used for processing email as text only. |
OAUTH2 |
Select
this option to utilize Microsoft Exchange's OAUTH2 protocol for
connecting to the Exchange server. (Note that this setting requires
SSL.) Enter the Application Name, Email Account User Name, Tenant
ID, Client ID, and Client Secret settings to use for connecting
to the Exchange server. Enable the Microsoft GCC High Environment setting
if your Microsoft account was created under the .US domain in
a Government Community Cloud High environment. Example
Click the Show Configuration Instructions link for more
information. Note: The inbound email account for processing email
must be isolated and not viewed. Any email that has been read
or set back to unread will be skipped during the conversion process.
If permitted by the email application, mark the inbound email
account used for processing email as text only.
Warning: We recommend using an incognito/private browse mode for this so stored personal credentials are not passed. |
(Optional) Test Email Settings/View Inbox |
Click the View Inbox link to display email processing errors and any email that has not been processed. |
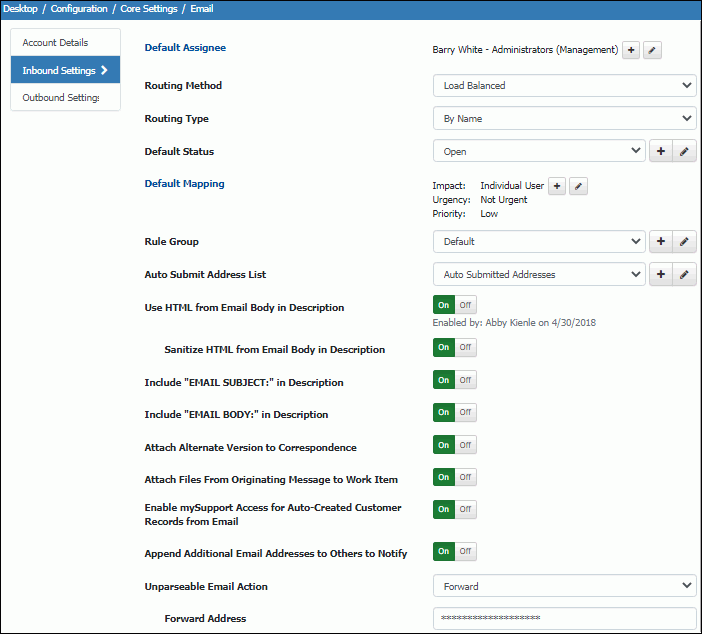
Use the Inbound Settings tab to configure the defaults to be applied to incidents and/or changes created from email sent to the inbound account, and updates applied to work items.
Route Method |
If there is no support representative available for a selected method, the incident and/or change will be assigned to the support representative specified in the Default Email Owner field. Note that any route method specified on an associated template (for a rule) will override this route method. |
Default Group |
If routing by group, select the support representative group for assignment. |
Default Location |
If routing by location, select the location for assignment. |
Default Status |
Select
the status to be assigned to email-submitted incidents and/or
changes. Any status specified on an associated template (for a
rule) will override this status. Only Open type statuses are available
in this field. You can use the Create New |
Default Mapping |
This field appears if Impact Urgency Mapping is enabled on the Basics tab. Click this link to select the Impact, Urgency, and Priority to assign to the Impact, Urgency, and Priority fields on email-submitted incidents and/or changes. Note that any mapping specified on an associated template (for a rule) will override this status. |
Default Priority |
This field appears if Impact Urgency Mapping is not enabled. Select the priority to be assigned to email-submitted incidents and/or changes. Note that any priority specified on an associated template (for a rule) will override this priority. |
Rule Group |
Select the rule group containing the rules to evaluate when the Email Processing agent runs and processes incoming email. If you select None, the default rule group will be used. |
Auto Submit Address List |
Select the group of email addresses (previously entered in the Auto Submit Address screen) that should have messages handled as auto submitted. This allows email and work item rules to simply include the single condition of “Auto Submitted Is Not True” in order to process incoming email. The Auto Submitted condition will be processed as True if an email's header contains an auto-submitted value or the message's From address matches one in the auto-submitted email senders list. This feature applies to all work item types that have correspondence processing and history. |
Use HTML from Email Body in Description |
Select Yes to enable HTML to be input and rendered by users in the body of an incoming email; attached images will display directly in the Description field. If No is selected in this field, attached images on incoming email will be rendered as attachments on the associated correspondence entry. Check your corporate security practices regarding the ability of users to input and render HTML in web applications. |
Sanitize HTML from Email Body in Description |
Select Yes to enable HTML tags (other than a specific whitelist) in the body of incoming email to be removed from the incident or change Description field. |
Include "EMAIL BODY" in Description |
Select Yes to include the text "EMAIL BODY" before the email body text that will be included in the incident or change description. For example, if "I have not been able to access the accounting application today." is the body of the email, the following will be included in the incident and/or change description: EMAIL BODY: I have not been able to access the accounting application today. |
Attach Alternate Version to Correspondence |
Select Yes to save any alternate version of the body of an email (created by the email application) as a document and placed on the Attachments tab of the correspondence. |
Attach Files From Originating Message to Work Item |
Select Yes to enable files attached to an email that is converted into an incident or change be included in the Attachments field rather than included as attachments to the work item’s associated Correspondence record. Note that this does not apply to updates; it only applies to messages that create new work items. |
Enable mySupport Access for Auto-Created Customer Records From Email |
A Customer Profile record is created when a customer sends an email-submitted incident from an address that does not already exist in Customer Profiles. Select this checkbox to enable the Approved to Access mySupport field by default when a Customer Profile record is created in this manner. |
Append Additional Email Addresses to Others to Notify |
Select Yes to enable the addition of any names in the CC or TO field (other than the mail-in name) of an email-submitted incident or change to the Others to Notify list for the incident if there is a matching Customer Profile. Only the CC field will be evaluated on an update. |
Unparseable Email Action |
Select the action to occur when an incoming email cannot be parsed: take no action, delete the email, forward the email to a specified address, or attempt to forward the email and then delete the email (regardless of the success or failure of the forward, the message will be deleted). Note that if Take No Action is selected, an error will display in the event log every time the agent runs for this email. |
Update History in Existing <Incident/Change/Problem/Opportunity/Purchase> Record if Number Included in Email
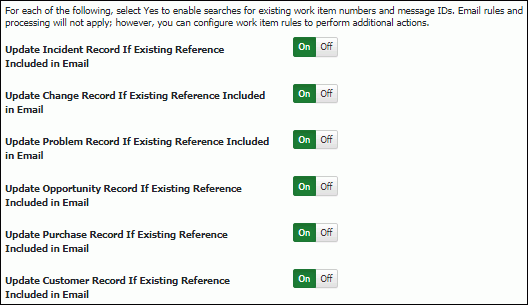
Select Yes to enable a search for an existing 10-character number for the applicable work item type or the message ID when the Email Processing agent runs. If a matching number exists, the matching work item is updated by including a notation in the Audit History field with a correspondence link to view the email and any attachments. Note that a space must be included before and after the number in order for the record to be updated. You can configure further actions to occur via the Rules screen in the applicable configuration module; you can configure work item rules that include conditions with the event <work item> Updated via Email or email rules with the event Email Does Not Include iSupport Reference for use with email processing.
Select No to perform defined email processing on the record. Email rules in the rule group associated with the email account will evaluate and apply any actions that correspond to met conditions; email rule actions can delete or forward the incoming email, as well as create an incident or change with a defined template. If a template is not defined, an incident will be created according to the settings on the Inbound Settings/Email Processing tab in the Email Accounts screen and the subject line and body of the email are placed in the Description field. If the Short Description field is enabled, the subject line will be placed in the Short Description field. If the sender does not have an email address that exists in a Customer Profile record, a new Customer Profile record is created for the email address. Any configured work item rules will also evaluate and perform actions such as sending notifications if conditions are met.
Update Customer Record If Existing Reference Included in Email - A reference ID is included on correspondence sent from a Customer Profile record; select Yes to perform a search containing that reference number or the message ID when the Email Processing agent runs. If a match exists, the Customer Profile record will be updated with a reference to the reply, and no new incident will be created. You can configure email rules with the event Email Does Not Include iSupport Reference and send a notification if applicable.
Select No to create a new incident. Email rules in the rule group associated with the email account will evaluate and apply any actions that correspond to met conditions; email rule actions can delete or forward the incoming email, as well as create an incident or change with a defined template. If a template is not defined, the incident will be created according to the settings on the Inbound Settings/Email Processing tab in the Email Accounts screen and the subject line and body of the email are placed in the Description field. If the Short Description field is enabled, the subject line will be placed in the Short Description field. If the sender does not have an email address that exists in a Customer Profile record, a new Customer Profile record will be created for the email address. Any configured work item rules will also evaluate and perform actions such as sending notifications if conditions are met.

 and View/Edit
  icons
to access the
icons
to access the