![]() Using the Content Manager
Using the View
and Report View Designers
Using the Content Manager
Using the View
and Report View Designers
![]() Configuring
iSupport Views, Charts, and Alerts
Configuring
iSupport Views, Charts, and Alerts
Use the View component on the Desktop to display iSupport data and perform actions such as searching, opening and routing records, and more.
You
can open any item in a view by selecting it, and you can select a
column heading to sort it in ascending/descending order. Next  and Previous
  navigation options will appear in
the ribbon bar when an item is opened from the View component. The
Next option will open the next record in the view, and the Previous
option will open the previous record listed in the view. This applies
to all iSupport record types within folders.
navigation options will appear in
the ribbon bar when an item is opened from the View component. The
Next option will open the next record in the view, and the Previous
option will open the previous record listed in the view. This applies
to all iSupport record types within folders.
Views
do not refresh automatically when items are created, changed, or deleted.
To refresh a view, click on the Refresh ![]() icon.
icon.
View functions on the left toolbar include:
 Select the view to display; you can enter text in the dropdown selector
to display a list of views matching the text you enter. An asterisk next
to a title indicates that alerts and/or charts have been created from
a view. A setting in the Configure
Select the view to display; you can enter text in the dropdown selector
to display a list of views matching the text you enter. An asterisk next
to a title indicates that alerts and/or charts have been created from
a view. A setting in the Configure  dialog enables you to use the selected view for the window title in the
component header.
dialog enables you to use the selected view for the window title in the
component header.
 Edit the selected view in the View
Designer.
Edit the selected view in the View
Designer.
 Create a view in the View Designer.
![]() Send a subscription email
with an attached file of exported view data to configured recipients on
a schedule; the email will be sent via the View Subscription agent, which
runs on a five minute interval. All of your configured view subscriptions
are listed on the View Subscriptions tab in the Preferences screen for
sending and deleting.
Send a subscription email
with an attached file of exported view data to configured recipients on
a schedule; the email will be sent via the View Subscription agent, which
runs on a five minute interval. All of your configured view subscriptions
are listed on the View Subscriptions tab in the Preferences screen for
sending and deleting.
 Display a quick tour of the View component.
Use the
Search field to perform a
literal case-insensitive search for a character string within all
data displayed in the current view. To perform a simple search, place
the cursor in the Search field, enter the character string, and click
the Quick Search  icon.
You can search for an incident number in an incident view, even if
it doesn't exist in a displayed column.
icon.
You can search for an incident number in an incident view, even if
it doesn't exist in a displayed column.
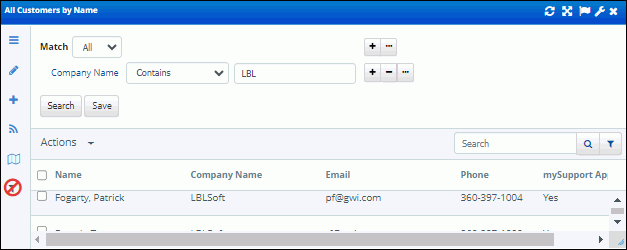
Click the Advanced
Search  icon to
set criteria for filtering data in a view. Use the
Match <All/Any> field to
specify whether you want every <field>
<comparison method> <value> search condition to be
met, or any configured condition to be met. Use the Add Condition and
Remove Condition
icon to
set criteria for filtering data in a view. Use the
Match <All/Any> field to
specify whether you want every <field>
<comparison method> <value> search condition to be
met, or any configured condition to be met. Use the Add Condition and
Remove Condition  icons
to display and remove a <field>
<comparison method> <value> search condition. Click
the Add Condition
icons
to display and remove a <field>
<comparison method> <value> search condition. Click
the Add Condition  icon
if you wish to include another condition. You can use the Add Condition
Group
icon
if you wish to include another condition. You can use the Add Condition
Group  icon to put a set of search conditions
to be evaluated together in a group. Click the Save button to enter a
name for the search and save it. The Saved Searches
icon to put a set of search conditions
to be evaluated together in a group. Click the Save button to enter a
name for the search and save it. The Saved Searches  icon
will display; hover over it to display saved searches.
icon
will display; hover over it to display saved searches.
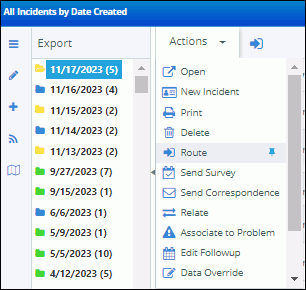
Use the Actions dropdown menu
to perform actions such as opening and routing records. Use the Add
to Quick Access Toolbar  icon to add icons to the top of a view. You can drag icons to change
the order. The view action will remain on the Actions menu with a
pin icon for removal from the quick access toolbar.
icon to add icons to the top of a view. You can drag icons to change
the order. The view action will remain on the Actions menu with a
pin icon for removal from the quick access toolbar.
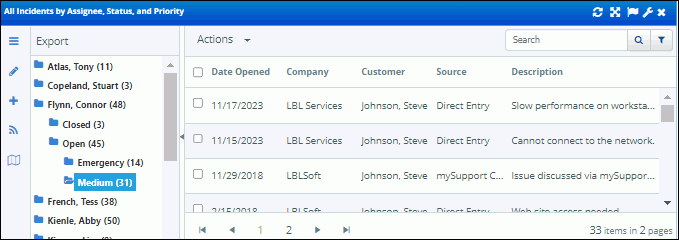
You can specify the number of entries per page in the Preferences dialog; when the number of entries exceeds the specified number of view entries per page, a set of view paging links appear at the bottom of the entries. You can use the following keyboard shortcuts for paged views on the Desktop: Press Alt + to move forward one page, Alt - to move back one page, Alt > to jump forward several pages, and Alt < to jump back several pages.
You can export view data in Microsoft® Excel (*.xls and *xlsx) formats, Microsoft® Word (*.doc) format, Portable Document Format (*.pdf), or Comma Separated Value Format (*.csv). Comma Separated Value Format is usable with Microsoft Excel and other third party tools.
Use the Export option on the Actions menu to export the data represented in the right frame; you'll be able to export all records at once, the current page, or a range of pages, all based on your current view, search, and sorting criteria.
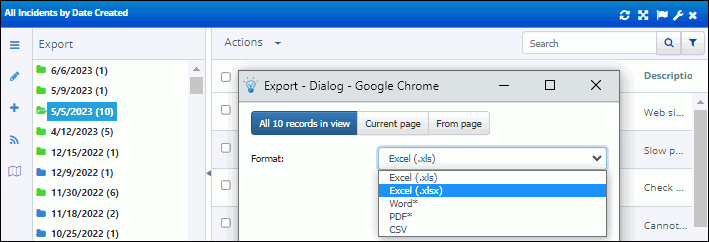
Use the Export link in the left categorized frame to export all records in the view, preserving any search results.
For Microsoft Word and Adobe PDF formats, the horizontal display will be clipped to the display size of the page.
Read/Unread/Updated icons can be enabled for incident, problem, change, and purchase views. In a view with the read/unread feature is not enabled, all folders will be blue. If read/unread feature is enabled for a view, the following will display:
 icon will
display next to an unread item or a folder with both unread and updated
items.
icon will
display next to an unread item or a folder with both unread and updated
items. icon
will display next to a folder with at least one updated item.
icon
will display next to a folder with at least one updated item.  icon will display next to a closed or
read item or a folder with both closed and read items.
icon will display next to a closed or
read item or a folder with both closed and read items. Enable these icons for custom views via the
Enabled Read/Unread button in the View Designer; to enable these
icons for default views, use the  and
and  options in the Content Manager.