![]() Configuring
iSupport Views, Charts, and Alerts
Configuring
iSupport Views, Charts, and Alerts
 Working With Desktop Dashboards
 Use the Alert Designer to configure a desktop notification
alert (and popup if configured) to appear when a view field reaches a
certain threshold. For example, you can configure an alert to appear when
a certain number of Emergency priority incidents has been reached. Access
the Alert Designer via the Desktop Content menu and the Alerts tab on
the Alerts and Dashboards Manager. See Configuring an Alert below for
more information.
Use the Alert Designer to configure a desktop notification
alert (and popup if configured) to appear when a view field reaches a
certain threshold. For example, you can configure an alert to appear when
a certain number of Emergency priority incidents has been reached. Access
the Alert Designer via the Desktop Content menu and the Alerts tab on
the Alerts and Dashboards Manager. See Configuring an Alert below for
more information.
![]() Use the Dashboards tab in
the Alerts and Dashboards Manager to add, delete, and rename dashboards,
set dashboard access, and automatically add a dashboard to the Desktops
of specified support representatives. See Managing
Dashboards via the Alerts and Dashboards Manager for more information.
Use the Dashboards tab in
the Alerts and Dashboards Manager to add, delete, and rename dashboards,
set dashboard access, and automatically add a dashboard to the Desktops
of specified support representatives. See Managing
Dashboards via the Alerts and Dashboards Manager for more information.
If you have the Create Personal Alert permission, you can configure
an alert via the Alert Designer option on the Desktop Content  menu, Alert
  icon in the View and Chart
components, and the Alert button in the View and Chart Designers. If you
have the Edit Shared Alert permission, you can modify an alert that is
configured to appear for multiple support representatives and/or support
representative groups.
icon in the View and Chart
components, and the Alert button in the View and Chart Designers. If you
have the Edit Shared Alert permission, you can modify an alert that is
configured to appear for multiple support representatives and/or support
representative groups.
Alert criteria is evaluated based on the schedule of the Alert agent, so be sure to schedule the Alert agent in the Options and Tools | Administer | Agents screen.
Use the Alerts tab in the Alerts and Dashboards Manager to configure and manage alerts. Acknowledge an alert to remove it from the Desktop Notification Center list; reinstate to enable the alert criteria to be evaluated the next time the Alert agent runs.

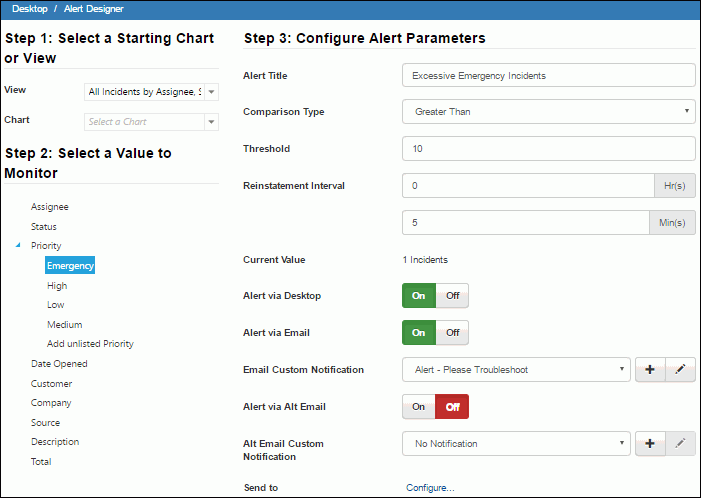
As with charts, alerts are based on view values; use the View field or the Chart field to select the view or existing chart on which to base the alert. If you select an existing chart, the view and value on which it is based will appear.
The values in the view appear in the Step 2: Select a Value to Chart section; select the value to be used as the basis for the alert. For example, if configuring an alert to appear when a certain number of Emergency priority incidents has been reached, you would select Emergency.
Use the fields in the Step 3: Configure Alert Parameters section to specify the title, criteria, and notification options.
Alert Title |
Enter a name for the alert. |
Comparison Type |
Select the condition that will use the value in the Threshold field to trigger the alert: Greater Than, Equal, Less Than, Less than or Equal, or Greater Than or Equal. |
Threshold |
Enter the number that will be used by the value in the Comparison Type field to trigger the alert. |
Reinstatement Interval |
Enter the number of hours and/or minutes after which the alert criteria should be made available to be checked by the Alert agent. |
Current Value |
The current number of view items appears; for example, if your view is based on incidents, the current number of incidents appears. |
Alert via Desktop Tab |
Select On to display the alert in the Notification Center list (and popup, if configured in Preferences) of those configured in the Send To field:
|
Alert via Email |
Select On to send an alert email to the email addresses of the support representatives selected in the Send To field (or all support representatives if none are selected.) |
Email Custom Notification
|
Select No Notification to send no notification or select or create a custom notification to send to the email addresses of support representatives and/or support representatives in the groups designated in the Send To field (or all support representatives if none are selected.). |
Alert via Alt Email |
Select On to send an alert email to the alternate email addresses of the support representatives selected in the Send To field (or all support representatives if none are selected.) |
Alt Email Custom Notification |
Select No Notification to send no notification or select or create a custom notification to send to the alternate email addresses of support representatives and/or support representatives in the groups designated in the Send To field (or all support representatives if none are selected.). |
Send To |
Click the Configure link to display a screen for selecting the support representatives and/or support representative groups that should receive the alert when the criterion is met. Note that if no support representatives are selected, the alert will be sent to all support representatives. |
After you configure an alert, be sure to schedule the Alert agent via the Options and Tools | Administer | Agents screen.
If you have the Delete Private Alert permission, you can delete an alert that you have created. If you have the Delete Shared Alert permission, you can delete an alert that is sent to configured support representatives. Note that you will need to remove any support representatives and/or support representative groups in the Send To field before you can delete an alert.