iSupport Custom
Field Features
iSupport Custom
Field Features
Use the Options and Tools | Customize | Custom Fields screen to define fields for entering information specific to your company; an unlimited number of label only, text, keyword, hyperlink, date, selection, and date/time fields can be defined. You can:
Note that in addition to these settings you can use the Category entry screen to enter custom fields that will appear when a category is selected in a work item screen, and use the Asset Type configuration screen to enter optional custom fields.
Row |
Enter the row number for the position of the field. Row one will be the first field on the tab, row two will be located under the first field, and so on. |
Label |
Enter the label for the field. |
Tooltip |
Enter the text to display when a user hovers over the field with a cursor. |
Required (for customer, company, asset, and CMDB custom fields) Required on Save (for incident, problem, change, and purchase custom fields) |
Select On to require the support representative to complete the field before the record can be saved. |
Required on Close (for incident, problem, change, and purchase custom fields) Required on Expiration (for service contract custom fields) |
Select On to require the support representative to complete the field before the record can be closed. For service contracts, select Yes to require the support representative to complete the field before the service contract status can be set to expired. |
Available to Reps |
Select Off to prevent support representatives from editing the field. Note that the field will still appear in a work item screen if included in a layout, and rules can change field values. |
Encrypt |
If your business has a specific mandate regarding column level encryption and you are already using 'database at rest' encryption, send a request to iSupport’s Technical Support department for a feature unlock code. |
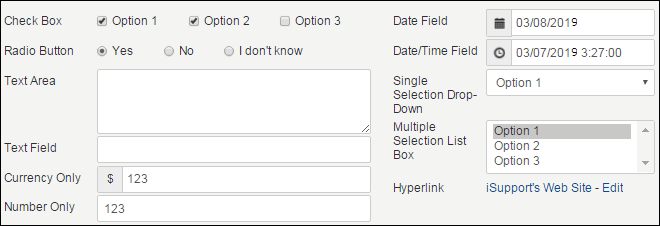
Type |
Select the format of the field. Click here to see an example of each type.
|
Options |
This
field displays when creating a radio button, checkbox, multiple
selection list box, or single selection drop-down. Enter or paste
items into this field; separate each value with a comma or a return
and click the Commit Items |
Default Value |
This field appears for Currency, Date, Date/Time, Hyperlink, Number Only, Text Area, and Text Field types; enter a value to appear as an option in the custom field by default.
|
Max Columns/Max Rows |
For Check Box and Radio Button type fields, enter the maximum number of columns to display (the fields will wrap to multiple rows); for a Multiple Selection List Box type field, enter the maximum number of rows to display (causing a scroll bar to appear). |
Validation |
Select On to enable date, date/time, currency, text area, and text custom fields to be validated upon entry (for example, the calendar picker will only make available valid dates for selection). Enter the parameters that the field will be validated against; the parameters will vary depending on the type of field. Currency: Enter a minimum amount, maximum amount, or both to specify a range. Date: Specify the basis for validation and then enter the number of days before or after the current date on which to make available dates. Use zero as the current date, positive values for future dates, and negative values for past dates.
Date Time: The information for the Date field above applies to this field, but Validation Start Time and Validation End Time fields are included for selecting available times on the available days for selection. Number Only: Enter a minimum amount and maximum amount; the number the user enters must be between the two numbers. Text Area/Text: Enter a minimum number of characters or a maximum number of characters; enter numbers in both fields to specify a range. |
Use the mySupport Access fields to enable display on mySupport portals and select the mySupport portal interfaces on which the custom field can appear.
Available to mySupport
|
Select On to enable the field to appear on a mySupport portal. |
Editable On New Incidents |
This field appears if Hyperlink is selected in the Type field on the Basics tab. Select On to enable the Edit link for Hyperlink-type custom fields on mySupport. Note: On is the default value; when off, the default text and URL are validated and the Edit link is hidden in mySupport. |
Editable On Existing <Incidents/Changes> |
Select On to enable the custom field to be edited by customers with the mySupport Custom Fields Editor permission. Note that you can use the Allow Edit field in the Configure Field dialog for custom fields on mySupport display layouts to disable/enable an individual Customer Profile custom field to be edited by customers with the mySupport Custom Fields Editor permission. |
Select mySupport Portals with Access |
If the Available to mySupport field is enabled, select the mySupport portal interfaces on which the field can appear. Note: If custom fields are associated with more than one level of a selected category set, the fields for all levels will display. |
Select On in the Enable Conditional Display field to configure the conditions on which to base display of the custom field.
Use the Match <All/Any>
field to specify whether you want every
<field> <comparison method>
<value> condition to be met, or any
configured condition to be met. Use the Add Condition  and Remove Condition
  icons to display and remove a condition. Click the Add Condition icon if you wish to include another condition. You can
use the Add Condition Group
icons to display and remove a condition. Click the Add Condition icon if you wish to include another condition. You can
use the Add Condition Group  icon to put a set of search conditions to be evaluated together in a group.
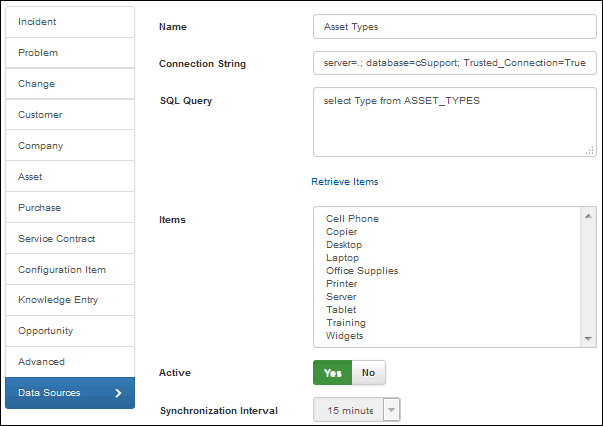
Use the Data Sources tab to map to a SQL data source and populate and synchronize options for list-type custom fields. You'll create a custom field data source definition, enter a connection string and SQL query, and specify the synchronization interval. After saving, the custom field data source definition will be available for selection in the Custom Field Definition dialog. The Options field will be populated and will not be editable after synchronization.
Name |
Enter a name for the SQL Server source definition. This name will appear in the list that can be selected in the Data Source field in the Custom Field Definition dialog (if a list-type format is selected in the Type field). |
Connection String |
Enter the connection string for accessing the source database. |
SQL Query |
Enter the SQL query string for accessing the field options in the SQL database. Click the Retrieve Items button to populate the Items field using this string. |
Active |
Select Yes to enable synchronization and update the Options list for a custom field with the information in the SQL source database. |
Synchronization Interval |
Select the number of minutes in the interval for the synchronization to be performed. |

 icon when finished. Select items to specify defaults and drag
items to change the order. Options can be populated by and synchronized
with a SQL data source via the Data Sources tab; this field will
not be editable after synchronization.
icon when finished. Select items to specify defaults and drag
items to change the order. Options can be populated by and synchronized
with a SQL data source via the Data Sources tab; this field will
not be editable after synchronization.