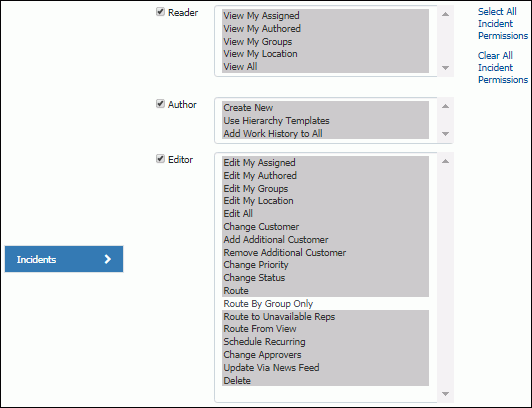
Click
the Editor checkbox to select all Editor permissions, or select
one or more of the following. Note that selecting an Edit permission
will restrict the support representative’s access to only that
permission. If a support representative has the Author | Create
New permission but no Editor | Edit permission, the Save and Close
Window menu option and icon will not be available after an incident
is initially saved.
Edit
My Assigned: Select to allow the support representative
to update any incident assigned to the support representative.
Note: the View My Assigned permission is required for this
permission.
Edit
My Authored: Select to allow the support representative
to update any incident he/she creates. Note: the View My Authored
permission is required for this permission.
Edit
My Groups: Select to allow the support representative
to update incidents assigned to any member of any group to
which the support representative is assigned. Note: the Edit
My Assigned, View My Groups, and View My Assigned permissions
are required for this permission.
Edit
My Location: Select to allow the support representative
to update incidents assigned to any support representative
in the location specified on the Details tab. Note: the Edit
My Assigned, View My Locations, and View My Assigned permissions
are required for this permission.
Edit
All: Select to allow the support representative to
update any incident in the iSupport application. Note: All
view and all edit permissions are required for this permission.
Edit
Authored Work History: Select to allow the support
representative to edit their own work history entries.
Change
Customer: Select to allow the support representative
to assign a customer to a saved incident. If this option is
not selected, the Select Customer option will not be included
in the Incident screen and the Name link will be disabled.
Note: one of the View permissions is required for this permission.
Add
Additional Customer: Select to allow the support representative
to add customers to an incident. If this option is not selected,
the Add Additional Customer option will not be included in
the Incident screen. Note: One of the View permissions is
required for this permission.
Remove
Additional Customer: Select to allow the support representative
to remove an additional customer from a saved incident. If
this option is not selected, the Remove Customer option will
not be included in the Incident screen. Note: one of the View
permissions is required for this permission.
Change
Priority: Select to allow the support representative
to select a priority for a saved incident. If this option
is not selected, the Priority field will display in the Incident
screen but the drop-down list will be disabled. Note: one
of the View permissions is required for this permission.
Change
Status: Select to allow the support representative
to select a status for a saved incident. If this option is
not selected, the Status field will display in the Incident
screen but the drop-down list will be disabled. Note: one
of the View permissions is required for this permission.
Change
Impact: Select to allow the support representative
to make a selection in the Impact field for a saved incident.
If this option is not selected, for all members of the group,
the Impact field will display in the Incident screen but the
drop-down list will be disabled. Note: the Impact and Urgency
fields cannot be enabled or disabled individually; you either
enable both or disable both. One of the View permissions is
required for this permission.
Change
Urgency: Select to allow the support representative
to make a selection in the Urgency field for a saved incident.
If this option is not selected, for all members of the group,
the Urgency field will display in the Incident screen but
the drop-down list will be disabled. Note: the Impact and
Urgency fields cannot be enabled or disabled individually;
you either enable both or disable both. One of the View permissions
is required for this permission.
Route:
Select to allow the support representative to assign an incident
to another support representative. If this option is not selected,
the Route icon and menu option will not be included in the
Incident screen and the Assignee link will be disabled. Note:
one of the View permissions is required for this permission.
Route
by Group Only: Select to restrict the support representative
to routing only to other support representatives in his/her
assigned group(s). Note: one
of the View permissions is required for this permission.
Route
to Unavailable Reps: Select to enable the support representative
to route to support representatives who are unavailable for
routing via the following methods: No is selected in the Available
for Routing field in the support representative's Profile
record or in the Rep Manager Desktop component, or the support
representative selected Out next to their name on the Desktop
menu. Note that this permission only affects manual routing
functionality; automated routing initiated from an email,
mySupport submission, or by rule using load balancing or round
robin methods only includes available support representatives.
Route
From View: Select to display the Route option in the
View component Action menu to the support representative.
Schedule
Recurring: Select to allow the support representative
to schedule tickets on a recurring basis for a specified timeframe.
Change
Approvers: Select to allow the support representative
to change approvers when an ad hoc approval cycle is initiated.
Update
News Feed: Select to include the Update link next to
incidents in the News Feed dashboard widget for the support
representative.
Delete:
Select to allow the support representative to delete incidents.
If this option is not selected, the Delete option will not
be included in the Incident screen. Note: one of the View
permissions is required for this permission.
