Use Microsoft® Windows-based authentication for the mySupport portal if you wish to bypass the Login prompt for accessing the Submit Incident, View Incident, or template features. In order for this option to work, each customer must have a Customer Profile record that includes his/her Microsoft® Windows user name (domainname\username).
When the iSupport application is accessed, IIS will pass the domain\username to iSupport, retrieve the user's Customer Profile record based on this login, and set up roles appropriately. The Login prompt will not display when a customer accesses the Submit Incident, View Incident, or template features on the mySupport portal.
This option is an alternative to iSupport’s built-in authentication method. With iSupport’s built-in authentication method, you would need to set up an iSupport mySupport portal login in the customer’s Customer Profile record and distribute that login to the customer.
Use the following steps to enable Microsoft® Windows-based authentication for a mySupport portal. It’s a good idea to perform these steps after work hours.
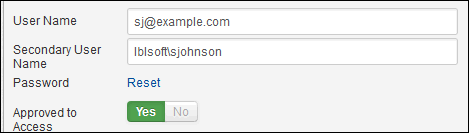
For each customer, enter the complete Microsoft® Windows user name (domainname\username) in the User Name or Secondary User Name fields in the mySupport Access section in the Customer Profile screen. (If using iSupport’s Active Directory integration, the initial synchronization process will populate the Secondary User Name field if the iSupport Services user account is a domain level account.)
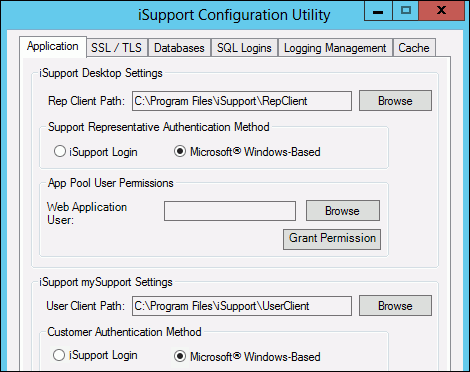
Open the iSupport Configuration Utility in the <directory in which iSupport is installed>\Utilities folder. In the mySupport File Path field, select the location of the mySupport portal (UserClient by default). Select the Microsoft Windows-Based radio button in the mySupport Setting section and then click Apply.