 Purchasing
- Features and Configuration Overview
Purchasing
- Features and Configuration Overview
![]() Configuring
iSupport Purchasing Functionality
Configuring
iSupport Purchasing Functionality
Purchasing functionality is available if you have the Service Desk Edition. Enable/disable Asset and Purchasing functionality via the Enable Features tab in the Feature Basics screen.
Core configuration options for Purchasing functionality include Purchase Request screen defaults and Work History field settings.
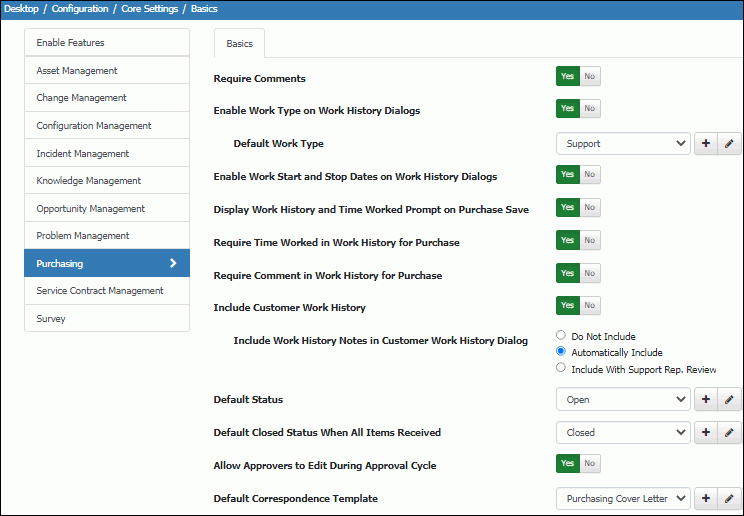
Purchasing Basics screen example
Require Comments |
Select Yes to require completion of the Comments field on a purchase request on initial save. This setting applies to requests submitted via the Desktop and mySupport portals. |
Enable Work Type on Work History Dialogs |
Select Yes to include a Work Type field in the Work History dialog in the Purchase Request screen. |
Default Work Type |
If the Work Type
field is enabled, select the work type to appear by default in
that field. Use the Create New |
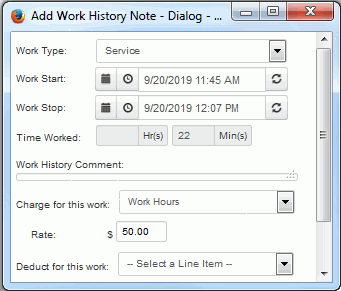
Enable Work Start and Stop Dates on Work History Dialogs |
Select Yes to include Work Start and Work Stop fields in the Work History and Purchase Save dialogs in the Purchase Request screen. The Work Start field defaults to the date and time the support representative loaded the work item. The Work Stop field defaults to the current time, but there will be at least a one minute gap between the Start and Stop times. For example, if a new purchase request is opened at 1:00 PM, the support representative works with the customer for 30 minutes, and then clicks the Add Work history option or saves and displays the Save dialog, the Work Start would be set to 1:00 PM and the Work Stop would be set to 1:30 PM. This Time Worked field would show the 30 minutes of time worked reflected by the gap. Support representatives can type directly in the Work Start
and Work Stop fields or use the calendar |
Display Work History and Time Worked Prompt on Purchase Save
|
Select Yes to display the Save dialog every time a support representative saves a purchase request. |
Require Time Worked in Work History for Purchase |
Select Yes to require an entry in the Work History dialog Time Worked field in the Purchase Request screen. |
Require Comment in Work History for Purchase |
Select Yes to require an entry in the Work History Comment field in the Purchase Save dialog before the record can be saved in the Purchase Request screen. |
Include Customer Work History Field |
Select Yes to include a field on the Purchase Request screen that includes work history notes for display when customers view their purchase requests/orders on the mySupport portal. The field will include basic purchasing events, and can include:
|
Include Work History Notes in Customer Work History Dialog |
This field appears if including the Customer Work History field. Select:
|
Default Status |
Select the Open
status to assign to newly-created purchase requests. You can click
the Create New |
Default Closed Status When All Items Received |
Select the Closed
status to assign to purchase orders when the quantity received
(before the slash in the Quantity field) is equal to the expected
quantity (after the slash in the Quantity field). You can click
the Create New |
Allow Approvers to Edit During Approval Cycle
|
Select Yes to enable support representatives designated as approvers (or those with Approval Override) to have access to all functionality except Status in records in an approval cycle. You can configure the Pending Purchase Updated notification to be sent when the Edited During Approvals event occurs; see Creating Rules for Purchases. |
Default Correspondence Template |
Select the correspondence
template that will apply by default when a support representative
initiates a correspondence via the Purchase Request entry screen.
Correspondence templates that are active and enabled for the Purchasing
module will be available for this feature. Use the Create New
|
 and View/Edit
 icons to access the
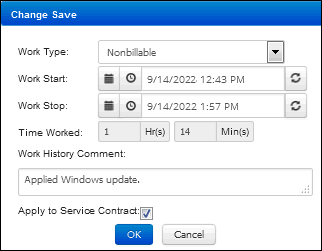
 and clock
  icons
to select the date and time; the difference will populate automatically.
The refresh
icons
to select the date and time; the difference will populate automatically.
The refresh  icon will
set the date and time to the current date and time (but the Work
Stop date and time will adjust to be at least one minute past
the Work Start date and time).
icon will
set the date and time to the current date and time (but the Work
Stop date and time will adjust to be at least one minute past
the Work Start date and time).