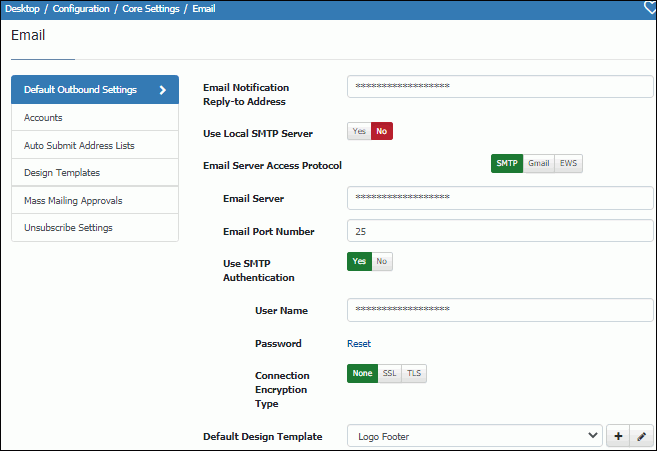
Your default outbound email server settings may have been set through the Initial Setup Utility that appears after iSupport is installed and accessed for the first time. Use the Default Outbound Email Settings tab in the Core Settings | Email screen to define the reply-to address, server, and access settings for all notifications generated by iSupport when no applicable rule or email processing applies. See Configuring Unsubscribe Settings for information on configuring unsubscribe links and text that will be appended to outbound email correspondence.
| Email Notification Reply-to Address | Enter the address to be included in the Reply To field for notifications generated by iSupport. Format the email address according to the following example: [email protected] |
| Default Design Template | Design templates include elements
(text and images) to appear around the body of the correspondence
template and support representative signature (if applicable).
Select the design template to apply to outbound email by default
(if one associated with a correspondence template or custom notification
isn’t in effect). Use the Create New |
Select Yes in the Use Local SMTP Server field to use the local SMTP server as the default for outbound email notifications sent by iSupport. Example
Use Local SMTP Server |
Select No if a server that is different from the local server on which iSupport is installed will be used as default for outbound mail. |
Email Server Access Protocol |
|
SMTP |
|
Email Server/Email Port Number |
Enter the name or IP of the email server and the port number to be used for outbound mail sent by iSupport. Example The default outbound mail port number is usually 25, but this number will change depending on your selection in the Outbound Server Connection Encryption Type field. Verify that the number is correct and change it if necessary. |
Use SMTP Authentication |
If you’ll be using a server that is different from the local server on which iSupport is installed for outbound email, select Yes to pass a user name and password to the outbound mail server. |
User Name/Password |
Enter the login to authenticate against the server for accessing the outbound email account. |
Connection Encryption Type |
Select the encryption type for the outbound server, if any: Transport Layer Security (TLS) or Secure Socket Layer (SSL). The default in the Outbound Mail Port Number field will change depending on your selection; verify that the number is correct and change it if necessary. |
| Gmail | Select this option to use Gmail account credentials to send outbound notifications by default. Example |
| Enter the Google API Client ID and Google API Client Secret from your Google Gmail API Project and select Grant Gmail Access. Click the Show Configuration Instructions link for more information. | |
| EWS | Select this option to use Microsoft Office 365 Exchange Web Services (EWS) to connect to the server for sending outbound notifications. |
EWS Authentication Method |
|
Basic |
Select this option to utilize Microsoft Exchange's HTTP basic access method for connecting to the Exchange server via a server name/IP, exchange account user name, and password. Example |
Exchange Server/Account User Name/Password |
Enter the name or IP of the Microsoft Exchange server account user name, and password to use for connecting to the Exchange server to send outbound notifications. |
OAUTH2 |
Use
this option to utilize Microsoft Exchange's OAUTH2 protocol for
connecting to the Exchange server via an application name, tenant
and client ID, and client secret. Enable the Microsoft GCC High Environment setting
if your Microsoft account was created under the .US domain in
a Government Community Cloud High environment. Click
the Show Configuration Instructions link for more information.
(Note that this setting requires SSL.) Example
Warning: We recommend using an incognito/private browse mode for this so stored personal credentials are not passed. |