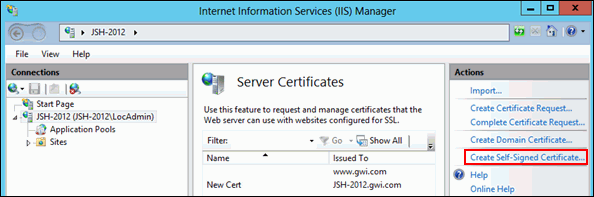
Open IIS and go to Server Certificates.
On the menu on the right, select Create Self-Signed Certificate (the cert will use as authority and validity the FQDN of your machine; if you do not wish to use that as your URL, you must select a different method). Example
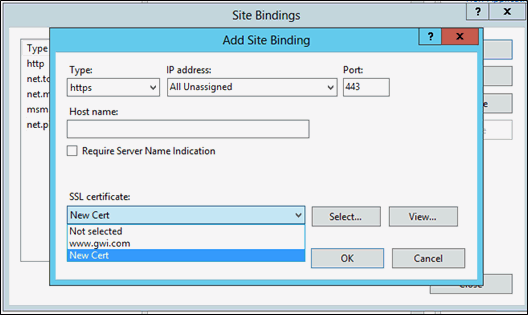
Expand the sites folder in IIS and select the website in which you installed iSupport. Note that it will use Default Website unless otherwise specified. On the menu on the right, select Bindings. For Type, select HTTPS. For Port, leave it at industry standard 443. For SSL Certificate, select the cert you generated on the previous step. Example
Your
website is now enabled and configured to use SSL. As an example, for
any of the next steps where you see https://valid_url_here, you would
use https://jsh-2012.gwi.com which is the URL our provided certificate
can validate.
Note: self-signed certs are only trusted by the machine that generated
it; your users will get cert warnings when they hit the page. You
can distribute your cert to them, ask your administrator to push the
cert via a GPO, or simply use one of the other cert methods (purchase,
in-house cert authority).
TLS 1.2 must be enabled in the registry, and the .NET Framework must be forced to use TLS 1.2. For more information, see https://docs.microsoft.com/en-us/mem/configmgr/core/plan-design/security/enable-tls-1-2-client.
Update your iSupport web.config to use SSL via the iSupport Configuration Utility.exe; the utility can be found on the path you installed iSupport under (default is C:\Program Files\iSupport\Utilities). Then go to the SSL/TLS tab and update your URL and radio buttons accordingly. Note that the URL you enter must resolve to the webserver and must be valid for the SSL cert configured in step 1. Example
In order to use Single Sign-on (SAML), the Rep or mySupport interface must be configured to use Forms Authentication; it does not work with Windows Authentication. Verify that the Rep or mySupport interface is configured to use Forms Authentication via the Application tab on the iSupport Configuration Utility.
Update the Rep URL in the iSupport Application URL field in the Configuration | Core Settings | Global Settings screen. If using the mobile interface, update the Mobile Desktop URL field. Note that you must use the URL that was used in the web.config file.
Update the mySupport URL in the Configuration | Core Settings | mySupport | Portals screen. For each portal you wish to update, select the name in the list screen to open its configuration settings. Select the cog icon to the right of the Name field and then update the URL field on the Basics tab. Select Finish in the bottom right corner of the screen, and then select the Save disk icon in the upper right corner.
Note that paths are subject to change at Microsoft’s prerogative. To configure the Microsoft side you must log in to Azure with a company administrator account.
Log in to Microsoft at https://portal.azure.com/
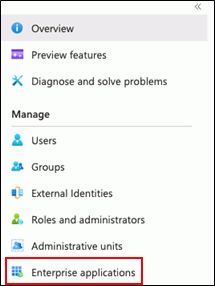
From Services, select Azure Active Directory.
From the Manage menu, select Enterprise Applications. Example
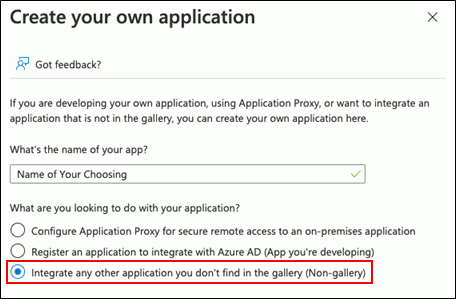
Select New Application and then select Create Your Own Application. In the Create Your Own Application screen, enter an app name and select the Integrate Any Other Application You Don’t Find In The Gallery (Non-Gallery) option. Example
Once the app is created, select the Set Up Single Sign On (either from Manage or the Getting Started menu). When prompted to select a single sign-on method, select SAML. Example
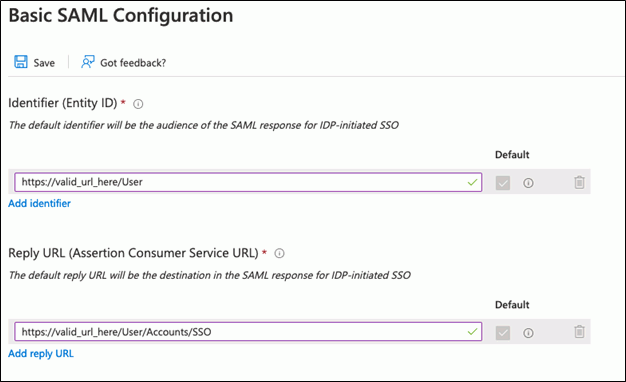
For Step 1: Basic SAML Configuration, select Edit and provide the following required information. Note that iSupport’s online help has a Configuring Single Sign On Integrations topic that covers URLs.
Identifier (Entity ID) - this is the issuer URL
Reply URL (Assertion Consumer Service
URL) - this is the consumer URL
In our example, with mySupport, the Identifier would be https://valid_url_here/User
and the Reply URL would be https://valid_url_here/User/Account/SSO.
Example
For Step 2: Attributes and Claims, iSupport needs one attribute UID. You can map this to whatever you want but that value must match a login or secondary login of a Customer record or login of a Rep record. In this example, a claim named UID will be added and mapped to the UserPrincipalName. Example
For Step 3: SAML Signing Certificate, simply click and download from Federation Metadata XML (you will use this in iSupport).
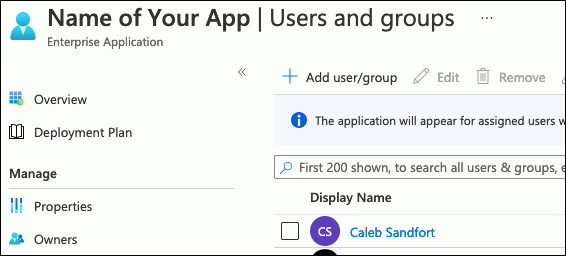
Go back to the App properties, select
Users and Groups, and add the users and/or groups that will be allowed
to access the application in order to log in. Only those listed here
will be able to access iSupport. Example
This concludes configuration of the Microsoft side, but you can come
back if you wish to perform a test after you have set up single sign
on in iSupport.
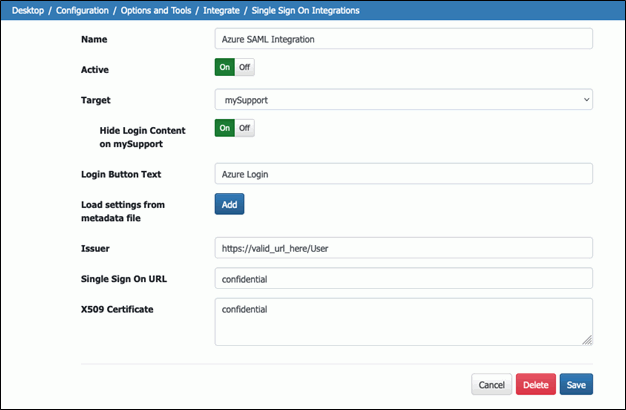
In iSupport, go to Configuration | Options and Tools | Integrate | Single Sign On Integrations and select Create.
Enter a name and select On in the Active field.
Select your target; note that this must match what you configured in Microsoft. For example, if you used Rep Provider and Rep Consumer, your target is Rep. In our example, we have been using mySupport so mySupport will be selected here. If On is selected in the Hide Login Content on mySupport, the default mySupport forms login button will be hidden and only the Azure SAML login button will be shown.
In the Login Button Text field, enter the text to appear on the login button.
In the Load Settings From Metadata File field, select the Add button and use the file downloaded in step 8. This will populate the Issuer, Single Sign On URL, and X509 Certificate fields.
Important: update the Issuer field to include your Issuer URL. (The value that Microsoft XML file loads is incorrect.)
Select the Save button. Example
Log in to Microsoft and click the Test button or access your user portal and try logging in. Note that: