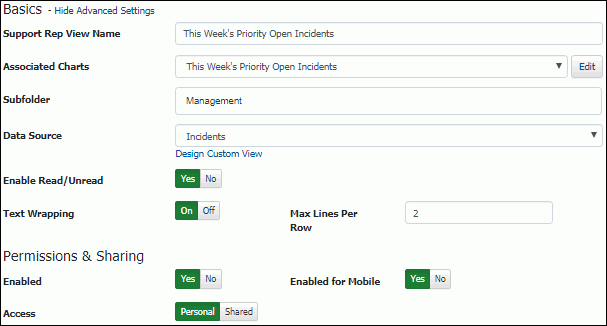
Click the Show Advanced Settings link to configure settings that affect the entire report. The Enabled for Mobile field will not appear for mySupport views.

In the Subfolder section, enter the name of the folder in which to place the view in the Content Manager and in view lists. This folder will be placed under the folder named after the data source selected for the view.
In the View Type field, select:
Standard views contain a few calculated fields (under the Aggregates field section) but do not enable you to configure calculated counts, percentages, sums, averages, minimums, and maximums on selected fields. Report views enable you to configure calculated counts, percentages, sums, averages, minimums, and maximums on all selected fields.
In the Data Source field, select the type of data on which the view will be based. The Config options in the dropdown list correspond to functionality enabled in the Configuration module. Use the Design Custom View link next to the Data Source Field to utilize any custom SQL views/queries of iSupport data. The Custom Table or View Name field appears for you to enter the name of the query or custom SQL table of iSupport data. Click the Load Columns button to display the fields available for the view. Use the Design Standard View link to redisplay the Data Source field. The For Records Pending Deletion field appears for data sources that have pending deletion functionality (Assets, Companies, Config - Categories, Config - Rule Groups, Config - Support Representatives, Customers, and Survey Requests). Records pending deletion have been deleted by an iSupport user but are retained in the system because of references to other records (incidents, correspondence, etc.) The Database Maintenance agent ultimately removes the record. Use the For Records Pending Deletion field to specify whether to include, exclude, or include only records pending deletion.
The Enabled Read/Unread field appears for incident, problem, change, and purchase views. In a view with the read/unread function not enabled, all folders are blue. Select Yes to display:
Right-click on a folder to display Mark All Read and Mark All Unread options.
Select On in the Text Wrapping field to, for all text fields in the view, restrict the number of lines that display in a cell. The maximum number you can enter in the Max lines Per Row field is 10.
In the Enabled field, select No if you wish to prevent the view from being included in the Chart Designer, Alert settings screen, and in the list of views available for selection by support representatives. Views can also be disabled after selection in the Content Manager.
The Enabled for Mobile field appears in the View Designer for rep views (mySupport views as they are automatically optimized for display (with rows instead of columns) on a mobile device). Select Yes to enable the view for display on a smart phone (iOS, Android, or Blackberry) or tablet to access iSupport. See Accessing iSupport via a Mobile Device for more information.
In the Access field, select one of the following. Note that permissions control whether you can create a personal or shared view.
Note: If you designate a view as Shared, it will appear to you under in the My Views folder; the My Views folder contains views that you have personally created via the View Designer.
If displaying settings for an existing view on which one or more charts have been defined, the charts appear in the Associated Charts dropdown along with an Edit link. You can select a chart and click the Edit link to display the chart settings in the Chart Designer.