You can schedule one or more changes to be created with an open status at a future date/time. You can schedule a single occurrence change or, if configured, a recurring set of changes. Scheduled changes are assigned the open status by the Change Scheduling agent. You must complete the scheduling dialog before the change has been saved.
You can generate scheduled Change records prior to the time at which the status changes; when this occurs, the scheduled changes have a Scheduled status and all fields can be updated except the Status field. Administrators can use the Scheduled status in rules to stop notifications. When the specified open date/time is reached on a scheduled change, the status will change to the specified open status and the rule group will go into effect using the open date/time.
In the Change screen, select Change | ![]() Schedule
to display the Scheduling dialog.
Schedule
to display the Scheduling dialog.
In the Open Date field, enter the date and time at which the status should be changed to an Open status, and use the Open Status field to select the status. When the open date time is reached, the scheduled change will become a normal open change and the rule group will go into effect. No new changes are created for a single occurrence schedule.

If you wish to create the change prior to the open status change, select the amount of time in the Generation Time Prior to Open Status Change field. The change will have a status of Scheduled until the date and time in the Open Date field. To send a warning notification a specified amount of time before the open status change, select the time in the Warning Interval Prior to Open Status Change field.
If configured, you can select Recurring to create a new change on a repeated basis at a specified date/time. When each new change is created, it will be initially saved in the Scheduled status and only notification rule actions will be executed. When changes are created on a recurring basis, the change on which you set the schedule will close automatically when the final change is created from it.
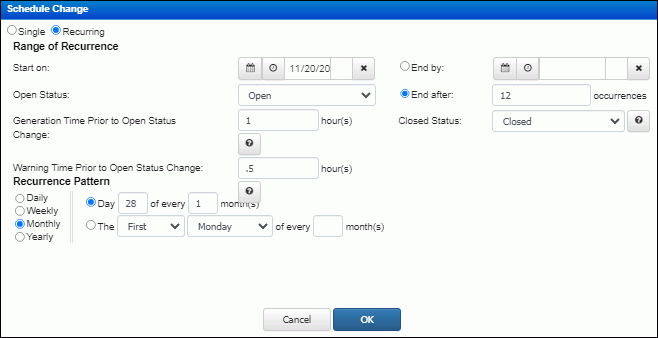
In the Start Date field, enter the date/time at which the status should be changed to an Open status, and use the Open Status field to select the status. If you wish to create the changes prior to the open status change, select the change creation time in the Generation Time Prior to Open Status Change field. Notifications may be configured to be sent at that time. The changes will have a status of Scheduled until the date and time in the Open Date field. To send a warning notification a specified amount of time before the open status change, select the time in the Warning Interval Prior to Open Status Change field.
In the Start Date field, select the date on which the first change should be created. Use the End After field if you wish to create a specified number of changes; use the End By field if you wish to end the change creation schedule on a specified date. When the final change is created, the change on which you set the schedule will close; use the Closed Status field to select the Closed status to assign to it. Notations are included on the History tab on all changes created from the schedule. Once the originating schedule is closed, you can view it via one of these notations in a change created from the schedule.
Use the Recurrence Pattern section to specify how changes should be created on a repetitive basis:
Select Daily to create a change every weekday or specified number of days.
Select Weekly to create a change on a specified weekday (Sunday-Saturday) for an interval of a specified number of weeks.
Select Monthly to create a change for an interval of a specified number of months. Then select the day of the month on which each change should be created.
Select Yearly to create a change yearly on a specified month and date or specified day of the week on a specified month.
You can view scheduled changes that have been created and have a scheduled
implementation date by selecting View | ![]() Scheduled
Changes in the Change screen or via the Scheduled Changes action on Change
views on the Desktop.
Scheduled
Changes in the Change screen or via the Scheduled Changes action on Change
views on the Desktop.