You can use the Add, Add Existing, Insert, and Insert Existing links to create larger hierarchies as shown in the example below. It is useful to chart your template structure using a white board to ensure that it is logical and complete.

You would use the following steps to create the workflow:
Use the New link to create and save the Set Up New Employee template.
Select the Set Up New Employee template and click the Add link. Create and save the Configure Network Account template.
Select the Configure Network Account template and click the Add link.
Create and save the Finish Paperwork template.
Select the Finish Paperwork template and click the Add link.
Create and save the Complete Employment Contract template.
Select the Set Up New Employee template and click the Add link. Create and save the Install Telephone template.
Select the Install Telephone template and click the Add link.
Create and save the Assign Telephone Number template.
In addition to the dependency created when you add or insert a template, you can define a dependency on a template that is not on a level directly below the specified template. In the following example, a dependency can be defined for the Assign Phone Number template so that a change will not be created from it until a change created from the Finish Paperwork template is closed.
To define this type of dependency, you would first select the template (Assign Phone Number in this example) and click the Edit link.
In the Hierarchy Template screen, click the Depends on Closure of Changes Created From link on the Advanced tab. In the Select Hierarchy Template Dependency dialog, select the template from which a change must be closed before a change will be created from current template.
Continuing with the example, you would select the Finish Paperwork template.

The dependency is noted next to the template title when you view the hierarchy templates.
Note: When you use the Edit link to change a template, the change will not be reflected in any other hierarchies that use the template. Changes already created from the template are not affected; however, future changes created from the template will reflect the change.
When you use the Add Existing link to add an existing template to a hierarchy, a copy of the existing template is placed a level under the selected template and changes can be made if necessary. If the template that is copied includes lower level templates, those templates are also copied.
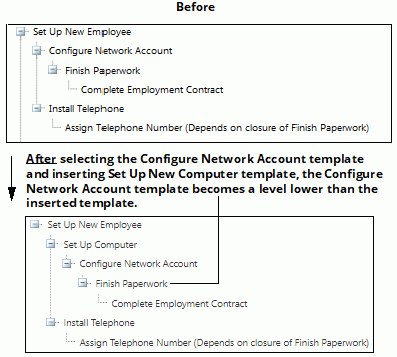
Once you have created a workflow hierarchy, you can use the Insert and Insert Existing links to insert a copy of a template into it. The inserted template will be placed above (as a parent to) the selected template, pushing the selected template down a level. If the template to be inserted includes lower level templates, those templates are also copied.
In the example below, if you were to select the Configure Network Account
template, click the Insert link, and create and save a template, the template
hierarchy would look like the following.