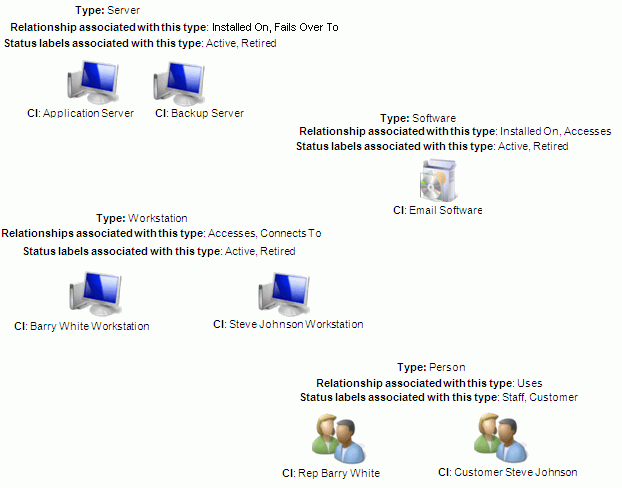
The following example illustrates how to create the simple CMDB hierarchy shown below.

The CMDB types, relationships, and status labels you’ll create are shown below.

Use the CMDB Custom Status Labels screen to define labels for status levels that can be assigned to configuration items. Labels in this example: Active, Retired, Staff, Customer.
Use the Relationships screen to define relationships between CIs. Relationships in this example: Fails Over To/Supports Fail Over, Installed On/Contains, Accesses/Accessed By, Connects To/Connected To, Uses/Used By.
Use the Types screen to configure types for classifying CIs and defining the optional/custom fields and relationships available. Types in this example: Server, Software, Workstation, Person. For each type, select the Status checkbox in the Optional Fields section to display the Statuses tab and add the labels listed in the diagram above, and then select the Relationships tab and add relationships listed above.
Create the following configuration items via the Configuration Item screen: Application Server, Backup Server, Email Software, Rep Barry White, Customer Steve Johnson, Barry White Workstation, and Steve Johnson Workstation configuration items. Be sure to select the applicable type as shown in the diagram above. Don’t complete the Relationships tab; you’ll add the relationships in step 5.
Add a Configuration Item view to a tab on the Desktop. Following the steps below, use the Configuration Item screen to add relationships between configuration items as shown in the first graphic above. Start at the bottom of the diagram and work your way up.
Open the Rep Barry White CI record; on the Relationships tab, click Add, select Uses, and then select the Barry White Workstation CI. Save and close the window.
Open the Customer Steve Johnson CI record; on the Relationships tab, click Add, select Uses, and then select the Steve Johnson Workstation CI. Save and close the window.
Open the Barry White Workstation CI; on the Relationships tab, click Add, select Connects To, and then select the Steve Johnson Workstation CI. Click Add, select Accessed By-Accesses, and then select the Email Software CI. Save and close the window.
Open the Steve Johnson Workstation CI; on the Relationships tab, click Add, select Accessed By-Accesses, and then select the Email Software CI. Save and close the window.
Open the Email Software CI; on the Relationships tab, click Add, select Installed On, and then select the Application Server CI. Save and close the window.
Open the Application Server CI; on the Relationships tab, click Add, select Fails Over To, and then select the Backup Server CI. Save and close the window.
To view the relationships, add the CMDB Relationship Viewer to a Desktop tab. Click on an item to display related items below it.
Associate a configuration item with an incident. For example, customer Steve Johnson cannot access email; an incident is created with that customer and the Email Software configuration item is added to the Configuration Items field.